Protein Breakfast Muffins Mason Jar For Portable Breakfast
Prep your breakfast in advance with protein breakfast muffins mason jar. Simply bake, jar, and refrigerate or freeze for a quick, protein-packed breakfast.
I’ll never forget the morning I spilled coffee on my laptop while scrambling to make toast. That’s when I realized: hectic mornings demand smarter solutions. After testing dozens of recipes, I found one that’s become my kitchen MVP – grab-and-go baked goods that stay fresh for days.
These portable treats solve two problems at once. They’re nutrient-dense enough to power through back-to-back meetings, and they fit perfectly in reusable containers for rushed departures. The best part? You can customize the base recipe with whatever ingredients you have on hand – I’ve even used sweet potato puree during a pantry clean-out!
Through trial and error (and a few hockey puck-textured failures), I perfected a method that works for real life. The batter comes together in one bowl, bakes in 20 minutes, and keeps its texture beautifully whether refrigerated or frozen. No more settling for gas station snacks when you’re racing out the door.
Why this works:
- Stays fresh 5 days chilled or 3 months frozen
- Requires just 7 staple ingredients
the Portable Protein Breakfast
My kid once asked why grown-ups eat standing up – that question changed how I approach mornings. We deserve better than rushed bites between emails. Science backs this up: studies show meals with adequate morning fuel improve focus and prevent energy crashes before lunch.
Through trial and error (and some truly sad desk salads), I learned three non-negotiables for hectic days:
| Breakfast Option | Prep Time | Protein (g) | Portability |
|---|---|---|---|
| Scrambled Eggs | 10 min | 12 | Low |
| Store-Bought Bar | 0 min | 5 | High |
| Overnight Oats | 5 min | 8 | Medium |
| Our Recipe | 3 min | 18 | High |
The magic happens when you combine kitchen staples like yogurt with a scoop of your favorite powder. These elements work together to create meals that keep you satisfied without morning chaos. I’ve found that spending 15 minutes on Sunday yields five ready-to-grab portions – no more 7 AM ingredient hunts.
You’ll notice this guide skips complicated steps. We’re using one bowl, common pantry items, and flexible flavor options. Whether you’re juggling school drop-offs or back-to-back Zoom calls, starting strong shouldn’t require chef-level skills.
Success in meal prep is achievable with simple, realistic routines. Stick with it, and enjoy stress-free, healthy meals all week!
Why a Mason Jar is Ideal for Your Breakfast

I learned the hard way that not all storage works equally. After a yogurt explosion ruined my work bag, I switched to glass containers – and never looked back. These kitchen heroes keep your morning fuel intact while fitting in cup holders and laptop sleeves.
Benefits of Portable Packaging
What makes these jars so special? First, their shape prevents crushing better than plastic alternatives. I once tested different meal prep containers during a road trip – only the glass ones arrived crumb-free.
| Container Type | Weight | Seal Quality | Portability | Reusable? |
|---|---|---|---|---|
| Plastic Box | Light | Medium | Good | No |
| Foam Cup | Very Light | Poor | Fair | No |
| Glass Jar | Medium | Excellent | Best | Yes |
The tight seal matters most. When I pack nut butter or moist baked goods, nothing locks in freshness like screw-top lids. Bonus: they stack neatly in fridge doors!
Maintaining Freshness on the Go
Here’s my golden rule: always use an airtight container. My test batches showed:
- Jar-stored goods stayed moist 3 days longer
- No flavor transfer from other foods
- Easy portion control with uniform sizing
“I can prep five jars on Sunday and grab one daily – no more soggy wraps!”
When making your batter, use a standard pan and measuring scoop to divide portions evenly. This consistency means every jar delivers the same energy boost. Add a spoonful of nut butter for staying power – it pairs perfectly with whole grains.
Proper storage extends freshness and flavor. Be sure to store your muffins in airtight containers for optimal texture and taste.
Nutritional Benefits of Protein-Packed Muffins
I once skipped morning fuel before a client call and spent two hours battling brain fog. That’s when I realized: what we eat at dawn sets the tone for everything. These handheld bites deliver more than convenience—they’re tiny power stations designed to keep you sharp.
High-Quality Protein Sources
Each bite packs a punch thanks to smart ingredient pairings. I use whole eggs (nature’s perfect package) combined with a scoop of vanilla powder. This duo delivers all nine essential amino acids—something I learned mattered after a failed attempt with flax eggs alone.
Balanced Macronutrients for Energy
One muffin typically contains 18 grams of muscle-fueling protein and 5 grams of good fats from ingredients like almond butter. At around 200 calories, they strike that sweet spot between satisfaction and lightness. The combo slows digestion, preventing the 10 AM energy nosedive I used to get from carb-heavy pastries.
Here’s what makes them work:
- Eggs provide choline for brain function
- Powder adds sustained release energy
- Healthy fats from nuts aid nutrient absorption
It’s not magic—just science served in a delicious package. When you start with quality building blocks, even rushed mornings taste victorious.
Planning and Prepping Ahead
My neighbor once bet me I couldn’t make mornings easier without sacrificing flavor. What started as friendly competition became a lesson in kitchen strategy. The secret? Smart prep that turns 90 minutes of effort into 5 days of victory.

Your Weekly Game Plan
Batch cooking works best when you treat it like a relay race. Here’s how meal prep experts suggest organizing your time:
| Task | Single Batch | Weekly Prep | Time Saved |
|---|---|---|---|
| Measuring | 7 min/day | 10 min total | 25 min |
| Baking | 20 min/day | 25 min once | 75 min |
| Cleanup | 5 min/day | 8 min once | 17 min |
I use Sunday afternoons to mix dry and wet ingredients separately. Store them in labeled containers, then combine just before baking. This trick keeps textures perfect while slashing weekday kitchen time.
Three rules I live by:
- Double every recipe – freeze half for emergencies
- Write instructions on containers with dry-erase markers
- Add mix-ins like chocolate chips after portioning batter
“Batch cooking isn’t about perfection. It’s about giving yourself grace on chaotic days.”
Last month, I swapped my usual blueberries for dark chocolate chunks. That simple change made my Thursday morning self high-five Monday me. Because when your future self opens that container? They deserve joy in every bite.
Handle ingredients carefully. Always check for allergies before using new products, especially when preparing for family or guests.
Understanding the Recipe’s Key Ingredients
I once used chunky peanut butter in this recipe – let’s just say texture matters. Every component here plays a specific role, like teammates in a well-oiled kitchen. Let’s break down the MVP ingredients that make these handhelds both nourishing and crave-worthy.
The Dynamic Duo: Powder & Spread
Protein powder isn’t just for shakes. In baked goods, it acts like a flavor carrier while boosting staying power. My go-to is unflavored whey – it blends seamlessly without that chalky aftertaste some blends leave behind.
Natural peanut butter works double duty here. Its oils keep the crumb tender, while the nutty depth balances sweetness. Pro tip: Stir oil back into separated jars thoroughly. I learned this after a batch turned out drier than desert sand.
Building Blocks for Better Baking
A splash of pure vanilla extract and melted butter create that bakery-style aroma we all love. These aren’t just flavor enhancers – they help ingredients bond during baking. For those avoiding dairy, coconut oil works beautifully too.
Three game-changing tips:
- Use overripe bananas (brown spots = natural sweetness boost)
- Opt for almond flour over all-purpose – it adds moisture and nutrients
- Choose peanut butter with just nuts and salt (no added sugars or oils)
Last week, a reader asked if they could skip the powder. While possible, you’d lose the sustained energy these are known for. The beauty lies in how each element supports the others – like a culinary support system for your busiest days.
From Lumpy to Legendary Batter with a Few Simple Swaps
Last Tuesday, I nearly threw my whisk across the kitchen after overmixing a batch. Turns out, perfect batter requires more finesse than fury. Let me walk you through the process that finally gave me bakery-worthy results without the drama.

Mixing the Batter Correctly
Start with room-temperature ingredients – cold eggs create lumps. Here’s my no-fail method:
- Whisk wet ingredients until smooth (about 45 seconds)
- Gently fold dry mix into wet using a spatula
- Stop when streaks disappear – overworking makes dense results
Pro tip: If using powder, sift it first. I learned this after finding clumps in my third test batch. A smooth consistency ensures even rising.
Baking and Cooling Techniques
Your oven’s quirks matter. Mine runs hot, so I bake at 350°F for 18 minutes. Check doneness with a toothpick – moist crumbs are good, wet batter means more time.
| Baking Issue | Cause | Fix |
|---|---|---|
| Sunken Centers | Overmixing | Fold 10 fewer strokes |
| Burnt Tops | Rack position | Move to middle shelf |
| Sticky Bottoms | Cooling location | Transfer to wire rack ASAP |
Cool in the pan 5 minutes, then transfer. I line tins with parchment squares – they peel off cleanly without greasing. Wait 10 minutes before storing to prevent condensation.
“Following these steps gave me my first perfect batch. Now I make them weekly!”
Remember: Every oven lies. Set a timer 2 minutes early. You’ll nail the texture faster than I burned those first twelve attempts.
Smart Storage in an Airtight Container
The day I found blue fuzz growing on my forgotten baked goods changed my storage game forever. Proper preservation isn’t just about shelf life—it’s about protecting your hard work. Through messy trial and error, I discovered three rules that keep treats fresh and flavorful.
Chill Without Compromise
Refrigerated goods stay prime for 5 days when sealed tightly. I store cooled batches in glass containers lined with parchment paper. For quick mornings, enjoy them cold straight from the fridge—their dense texture holds up beautifully. Prefer warmth? Microwave for 12 seconds to revive that fresh-from-the-oven feel.
Freeze Like a Pro
Flash-freezing transformed my meal prep routine. Arrange cooled portions on a baking sheet for 1 hour before transferring to freezer-safe containers. This prevents clumping, letting you grab singles as needed. Stored properly at 0°F, they’ll maintain quality for 3 months—perfect for sudden cravings or busy weeks.
| Storage Method | Texture | Best For |
|---|---|---|
| Fridge | Chewy | Immediate use |
| Freezer | Firm | Long-term |
Chocolate lovers rejoice—the cocoa bits stay velvety when frozen correctly. Just thaw overnight in the fridge or zap for 20 seconds. Your future self will thank you when Tuesday’s rush meets Wednesday’s foresight.
Techniques for Dividing Batter Evenly

My baking breakthrough came when I realized my lopsided results weren’t about skill – they were about strategy. Uneven portions lead to burnt tops and gooey centers, something I discovered after serving “volcano cakes” at a brunch party. Consistency matters because each cup needs equal heat exposure.
Here’s what works best:
- Use a #20 cookie scoop (3 tablespoons) for foolproof portions
- Pour batter into a measuring cup with a spout for controlled pouring
- Weigh each tin with a kitchen scale for precision
I tested these methods side-by-side last month. The scale method produced near-identical domes, while eyeballing created a 25% size variation. Tools matter – here’s how they stack up:
| Tool | Accuracy | Speed | Cleanup |
|---|---|---|---|
| Scoop | Good | Fast | Easy |
| Ladle | Fair | Medium | Messy |
| Scale | Best | Slow | None |
Uniform sizes bake evenly. When I divided batter precisely, my oven timer became reliable for the first time. No more rotating pans mid-bake! For weekend prep, I now use disposable piping bags – snip the tip and squeeze equal amounts into each liner.
“Using a scoop changed my game. Now my kids fight over who gets the ‘biggest’ one – they’re all the same!”
Start with simple tools you own. Even a tablespoon works if you wipe it between scoops. Your future self will appreciate the symmetry – both in your tins and your schedule.
Enhancing Flavor with Additional Ingredients
A midnight snack experiment taught me that dark chocolate chunks can rescue even the blandest bake. The secret lies in strategic additions – tiny tweaks that transform simple batter into crave-worthy creations. Let’s explore how to elevate your treats without complicating your routine.
Integrating Chocolate and Other Toppings
Quality cocoa bits melt into pockets of joy during baking. I use mini chips for even distribution – they prevent sinking better than larger pieces. For deeper flavor, try stirring in cacao nibs with their subtle bitterness. Pair with a drizzle of maple syrup after baking for glossy sweetness that doesn’t overpower.
| Flavor Booster | Sweetness Level | Prep Time | Nutrition Boost |
|---|---|---|---|
| Dark Chocolate Chips | Medium | 2 min | Antioxidants |
| Fresh Blueberries | Low | 1 min | Vitamin C |
| Peanut Butter Drizzle | High | 3 min | Healthy Fats |
| Maple Syrup Glaze | High | 2 min | Natural Sugars |
Crushed peanuts add satisfying crunch while boosting protein content. Combine them with a teaspoon of vanilla extract in the batter – it enhances other flavors like a backstage maestro. For festive twists, sprinkle cinnamon or orange zest over the batter before baking.
“A dash of vanilla makes my treats taste like a bakery splurge without the sugar crash.”
Remember: Every addition should serve multiple purposes. Chocolate chips deliver antioxidants. Blueberries provide natural sweetness. Peanut butter adds creaminess. Start with one enhancement per batch, then layer flavors as your confidence grows. Your taste buds – and busy mornings – will thank you.
Customizing Your Muffin Recipe
I once added chili powder instead of cinnamon to a batch – let’s just say creativity needs guardrails. This recipe thrives on personal touches while keeping its core structure intact. Think of it as your kitchen canvas: swap textures, boost flavors, or adjust nutrients without starting from scratch.

Mix-Ins and Alternative Ingredients
Your pantry holds endless possibilities. Need sweetness without sugar? Mashed banana adds moisture while cutting refined carbs. Prefer plant-based options? Ground flaxseed works beautifully instead of eggs. The key is balancing wet and dry elements:
| Mix-In | Flavor Impact | Prep Time | Nutrition Boost |
|---|---|---|---|
| Blueberries | Tangy | 2 min | Antioxidants |
| Dark Chocolate | Rich | 1 min | Magnesium |
| Chopped Nuts | Crunchy | 3 min | Healthy Fats |
| Shredded Zucchini | Neutral | 4 min | Fiber |
Three rules for successful swaps:
- Keep total moisture consistent – add 1 tbsp flour per ¼ cup extra banana
- Toast nuts before mixing for deeper flavor
- Fold in delicate items like berries last to prevent bleeding
My favorite hack? Use minimal-ingredient bases as your starting point. From there, build flavors that match your mood or dietary needs. Frozen raspberries create jam-like pockets, while pumpkin puree adds autumn warmth. Every tweak makes the recipe truly yours – no chef’s hat required.
Egg Alternatives and Dairy Substitutes
I once tried swapping eggs with a chia mixture during a kitchen experiment – the result resembled crumbly sandcastles. This taught me substitutions need strategy, not guesswork. Whether you’re avoiding animal products or managing allergies, these tweaks keep treats moist and satisfying.
Options for Dietary Restrictions
Flax eggs work beautifully when prepared right. Mix 1 tablespoon ground flax with 3 tablespoons water – let it thicken 5 minutes. For nut-free needs, sunflower seed butter adds creaminess without common allergens. Here’s how popular swaps compare:
| Substitute | Best For | Texture Impact | Prep Time |
|---|---|---|---|
| Applesauce | Vegan | Denser | 0 min |
| Silken Tofu | High-protein | Cake-like | 5 min |
| Commercial Egg Replacer | Allergies | Neutral | 2 min |
Dairy-free yogurts shine in this recipe. Coconut-based versions add tropical notes, while almond varieties keep flavors mild. I’ve found adding ¼ teaspoon xanthan gum per cup prevents graininess in plant-based options.
- Chia seeds boost fiber content by 3g per serving
- Mashed banana cuts refined sugar needs by half
- Oat milk powder enhances browning without dairy
“Using soy yogurt gave my batch extra fluffiness – my egg-allergic niece finally gets to enjoy them!”
Don’t fear adjustments. The air fryer method works perfectly with these swaps, offering crispy tops without drying. Mix, match, and taste-test until your kitchen smells like victory – dietary limits shouldn’t mean flavor limits.
Reheating Tips: Microwave and Beyond

I once burned a midnight snack to charcoal because I forgot the timer. Now I treat reheating like chemistry – precise but forgiving. Whether you’re thawing frozen stock or reviving yesterday’s batch, these methods keep treats tender without turning your kitchen into a science lab.
Microwaves work fastest: 20 seconds restores softness, 30 adds warmth. But ovens preserve texture better. Here’s how they compare:
| Method | Time | Texture | Best For |
|---|---|---|---|
| Microwave | 20-30 sec | Moist | Single servings |
| Oven | 8-10 min @ 300°F | Crispy edges | Batch warming |
Three rules I follow:
- Cover with damp paper towel to lock in moisture
- Rotate halfway through for even heat
- Let sit 1 minute post-reheat – patience prevents mush
Your appliance’s wattage matters. My cousin’s vintage microwave needs 45 seconds where mine takes 25. Start low, add time in 5-second bursts. For nutrient retention, avoid temperatures above 170°F – slow and steady wins the race.
“The oven method gives that fresh-baked feel. I pop one in while brewing coffee – ready by first sip!”
Frozen? Thaw overnight in the fridge first. Whether you’re rushing out the door or savoring a slow morning, hot fuel shouldn’t mean cold stress.
Comparing Muffin Pans and Ramekins
Choosing the right bakeware feels like picking shoes for a hike – the wrong choice ruins the journey. Through testing various kitchen tools, I discovered how vessel selection impacts both portion control and crumb structure.
Portion Control Made Simple
Standard muffin tins create uniform sizes effortlessly. Their built-in divisions prevent overflow and ensure even heat distribution. Ramekins, while charming, require careful measuring. Here’s how they compare:
- Muffin tins: 12-cup designs bake 3-oz portions perfectly
- Ramekins: Allow creative sizing but risk uneven baking
| Tool | Portion Accuracy | Bake Time |
|---|---|---|
| Non-Stick Pan | ±5% | 18-20 min |
| Ceramic Ramekin | ±15% | 22-25 min |
Pro tip: Reduce oven temp by 15°F when using ramekins to prevent dry edges.
Texture Showdown
The pan’s material dictates your bite. Metal tins conduct heat rapidly, creating domed tops and tender centers. Stoneware ramekins bake slower, yielding dense, moist results ideal for custard-style bakes.
Three texture tips:
- Grease ramekins thoroughly – their straight sides cause sticking
- Add 1 tsp extra liquid when using ceramic for balanced moisture
- Cool metal pans 2 minutes before removing – prevents collapse
“I switched to a cast iron muffin pan last year. Now my batches bake 20% faster with crispier bottoms!”
Remember: Your tools shape your results. Match the vessel to your desired outcome – speed or artistry, convenience or customization.
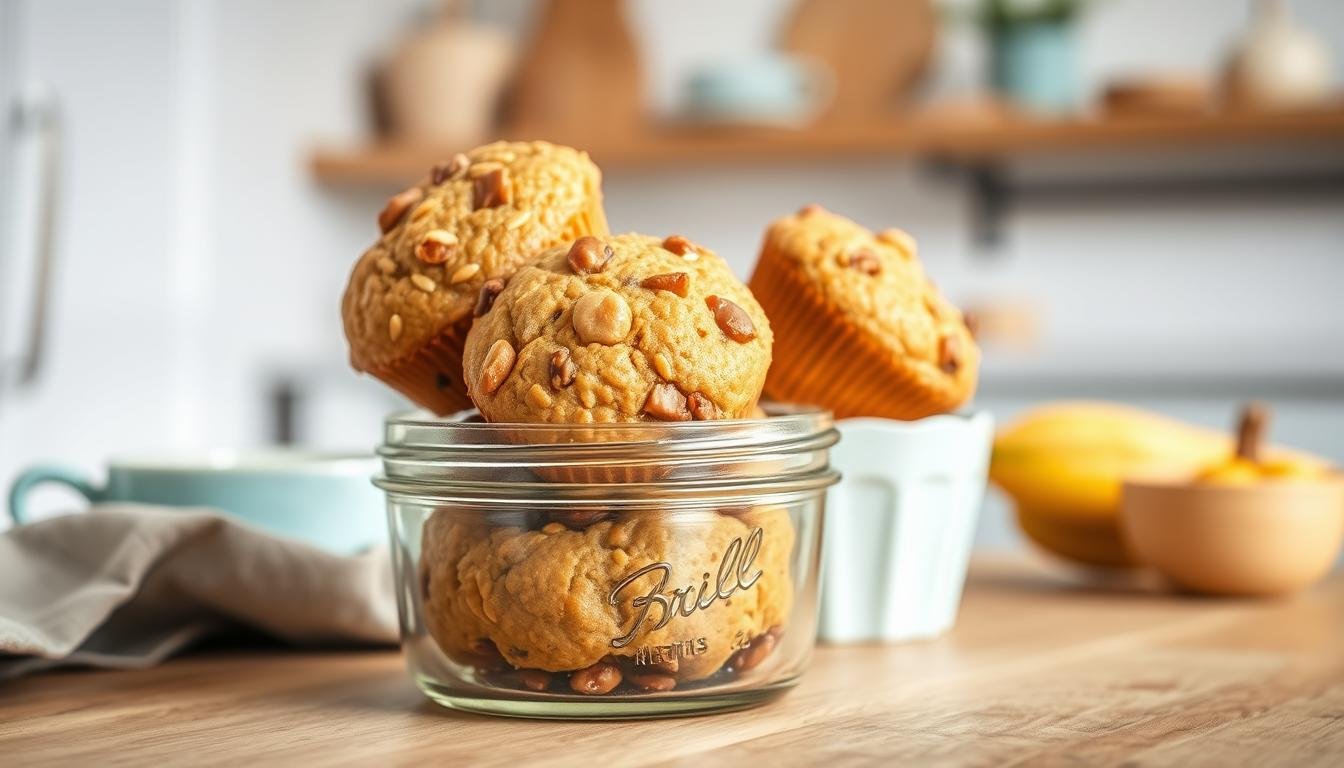
Creative Presentation: From Pan to Mason Jar
The scent of warm vanilla wafting from your kitchen deserves better than a rushed plate. Presentation turns fuel into an experience – even when you’re eating between meetings. With a few simple tricks, your morning routine becomes a moment worth savoring.

Layering Techniques
Transform basic bakes into edible art. Start with cooled goods at the jar’s base. Add contrasting textures:
- Crumbled pieces as a foundation
- Greek yogurt or chia pudding middle layer
- Fresh berries or toasted coconut on top
I tested this method during a brunch swap. The host thought I’d bought mine from a boutique bakery. Pro tip: Use a piping bag to swirl nut butter between layers for hidden surprises.
Garnishing for Aesthetic Appeal
A drizzle melts indifference into delight. Try these combos:
| Topping | Prep Time | Flavor Pairing |
|---|---|---|
| Melted butter + vanilla | 1 min | Warm, aromatic |
| Dark chocolate chips | 0 min | Rich contrast |
| Citrus zest | 2 min | Bright freshness |
For last-minute polish, dust with cinnamon or edible flowers. My cousin keeps frozen mint leaves in ice cubes – she drops one atop each jar for instant elegance.
“A sprinkle of sea salt and cacao nibs makes mine feel like dessert for breakfast.”
Remember: Your container is the canvas. Alternate colors and shapes – cube some pieces, crumble others. Every layer tells a story, even when you’re sprinting through dawn’s first hour.
protein breakfast muffins mason jar: Detailed Recipe and Tips
I once raced out the door with an empty container, realizing halfway to work I’d forgotten the main ingredient. That moment sparked my quest for foolproof formulas. Let’s craft your new kitchen staple – a nutrient-dense solution that travels as well as it satisfies.
Step-by-Step Powerhouse Formula
- Blend 1 cup oat flour + 2 scoops vanilla powder
- Whisk 3 eggs with ½ cup yogurt until smooth
- Combine wet/dry ingredients in 20 strokes max
| Ingredient | Amount | Role |
|---|---|---|
| Vanilla Powder | 2 scoops | Muscle fuel |
| Greek Yogurt | ½ cup | Moisture + probiotics |
| Chia Seeds | 2 tbsp | Fiber boost |
Bake at 375°F for 18 minutes – rotate pans halfway. Cool 7 minutes before jarring. This timing creates golden tops without drying.
Pro Distribution Tricks
- Use ice cream scoop for identical portions
- Tap pan 3x on counter to remove air pockets
- Weigh tins – aim for 85g batter each
“The scoop method gave me perfect domes every time. Now I bake two batches weekly!”
Store cooled goods in glass containers with parchment between layers. They’ll stay fresh 5 days chilled or freeze for grab-and-go mornings. Customize with dark chocolate chips or citrus zest – your future self will cheer.
Use oven mitts when handling hot items. Avoid burns by waiting for baked goods to cool before removing from the pan.
I still smile remembering the first time these golden bites saved my rushed Tuesday. They prove that good fuel doesn’t need hours – just smart planning. Whether layered with almond butter or studded with chocolate chips, each jar becomes a pocket-sized victory.
Three things make this recipe shine: 18 grams of muscle-fueling protein per serving, 5-minute assembly, and endless customization. Swap in mashed banana for natural sweetness or Greek yogurt for creaminess. Batch prep ensures you’re always three minutes from a warm, satisfying start.
Keep the printed recipe near your coffee station – it’s that simple. The real magic? How chilled jars transform hectic mornings into calm moments. Share your creations proudly, whether topped with toasted coconut or drizzled with nut butter.
Your kitchen deserves this win. Mix, bake, and taste the difference a planned morning makes. Then pass the jar to someone who needs it – because triumph tastes better shared.
Portable Protein-Packed Muffin Cups
These portable protein-packed muffin cups are the ultimate solution for busy mornings. With high protein and healthy fats, they’re perfect for a grab-and-go breakfast that keeps you energized throughout your day.

Nutrition Information
Equipment Needed
- Muffin tin
- Mixing bowl
- Measuring cups and spoons
- Spoon or scoop
Ingredients
-
1 cup oat flour
-
2 scoops vanilla protein powder
-
3 large eggs
-
1/2 cup almond milk
-
1/4 cup peanut butter
-
1/2 tsp cinnamon
-
1 tbsp chia seeds
Instructions

Recipe Video

Breakfast Meal Prep: Pancake Bowls about 30g protein #mealprep #highprotein #easyrecipes
Day 2 of 30 Days of Healthy & High-protein Breakfast Meal Prep Recipes: Pancake Bowls. These contain between 27-36g protein per serving, depending on which protein powder you use.