Protein Breakfast Muffins Greek Yogurt For Creamy Texture
Make protein-packed breakfast muffins with Greek yogurt for a creamy texture. Follow my simple recipe and tips for a no-stress morning routine.
What if your morning routine could start with something both indulgent and nourishing? I’ve burned my fair share of baked goods over the years—dry banana loaves, hockey-puck scones—but these tender, moist bites changed everything. They’re what I make every Sunday while my coffee brews, filling the kitchen with the kind of warmth that says, “You’ve got this.”
The secret? A dollop of thick, tangy yogurt folds into the batter like a cozy blanket. It creates a melt-in-your-mouth texture while packing each portion with staying power. No oil, gluten, or refined sweeteners—just honest ingredients that keep you fueled. I stash them in the freezer for chaotic mornings when toast feels too mundane.
This recipe thrives on simplicity. You’ll mix everything in one bowl (less cleanup!), and they bake in under 20 minutes. Pair them with energizing foods from your weekly prep for a breakfast that feels like a slow morning, even when life’s anything but. Let’s bake something that cares for you as much as you care for others.
Introduction to a High-Protein, Creamy Muffin Recipe
Mornings don’t have to mean choosing between quick and nourishing. After burning one too many rushed banana breads, I cracked the code: a batter that’s forgiving, fast, and secretly wholesome. These handheld bites combine simplicity with substance—no chef skills required.

Where Effortless Meets Satisfying
Think five core ingredients whisked in one large bowl. A single egg binds everything while adding lightness. The magic lies in swapping oil for a creamy base that keeps crumbs tender for days. Basic baking methods? Yes. Compromised flavor? Never.
Built for Real-Life Chaos
From mixing to cooling, you’re looking at 25 minutes—less time than scrolling breakfast inspo. I’ve tested this during daycare drop-offs and work-from-home crunches. The batter holds if your phone rings mid-pour. Bake a batch Sunday night, and you’ve got grab-and-go fuel that feels like a slow morning savored.
The Benefits of Baking with Greek Yogurt
I once tried substituting applesauce for oil in a cake recipe—let’s just say it tasted like a sad sponge. That’s when I discovered how thick, strained yogurt works miracles. Unlike thinner varieties, it adds richness without weighing down your batter. And here’s the kicker: it packs nearly twice the protein of regular yogurt while keeping fat content modest.

Acidity plays a key role here. When combined with baking soda, the tangy base creates tiny air pockets for lift. Add baking powder for extra oomph, and you’ve got a texture that’s cloud-soft yet sturdy. Too thick? A splash of milk adjusts consistency without diluting flavor. One food blogger put it perfectly: “It’s like adding a moisture insurance policy to every batch.”
| Ingredient | Texture Impact | Nutrition Boost |
|---|---|---|
| Greek Yogurt | Creamy, dense crumb | High protein, calcium |
| Regular Yogurt | Lighter, airier | Lower protein |
| Sour Cream | Rich, heavy | Higher fat |
Test kitchens agree—the calcium and probiotics in cultured dairy make treats feel less like indulgence and more like intentional nourishment. My favorite part? That subtle zing cutting through sweetness, reminding you this isn’t just another sugar bomb. Five tested recipes from trusted sources confirm: once you go Greek, there’s no going back.
Essential Ingredients and Substitutions
I once grabbed the wrong tub of yogurt for a batch—let’s just say my oven taught me a lesson. Building these handheld treats starts with smart choices. Let’s talk about what works (and what doesn’t) when life demands flexibility.

Fat Content Matters
Full-fat or 2% strained yogurt gives the creamiest texture. Non-fat versions can leave crumbs dry—trust me, I’ve salvaged enough hockey-puck batches to know. Look for unsweetened options to control sweetness. If dairy-free, coconut yogurt works but add 1 tbsp arrowroot starch per cup to mimic thickness.
Swaps That Stick
Protein powder acts like a flavor sponge. Vegan blends absorb more liquid, so add 2 tbsp extra yogurt. Whey-casein mixes stay airy. For flour, oat or almond keeps things tender. Whole wheat adds chew—perfect if you prefer heartier bites.
Vanilla extract isn’t just for aroma. A teaspoon balances earthy notes from whole grains. Always pair it with a pinch of salt—it’s the difference between “good” and “can I have another?” Need gluten-free? Swap 1:1 with a trusted blend. Baking is forgiving when you know the rules.
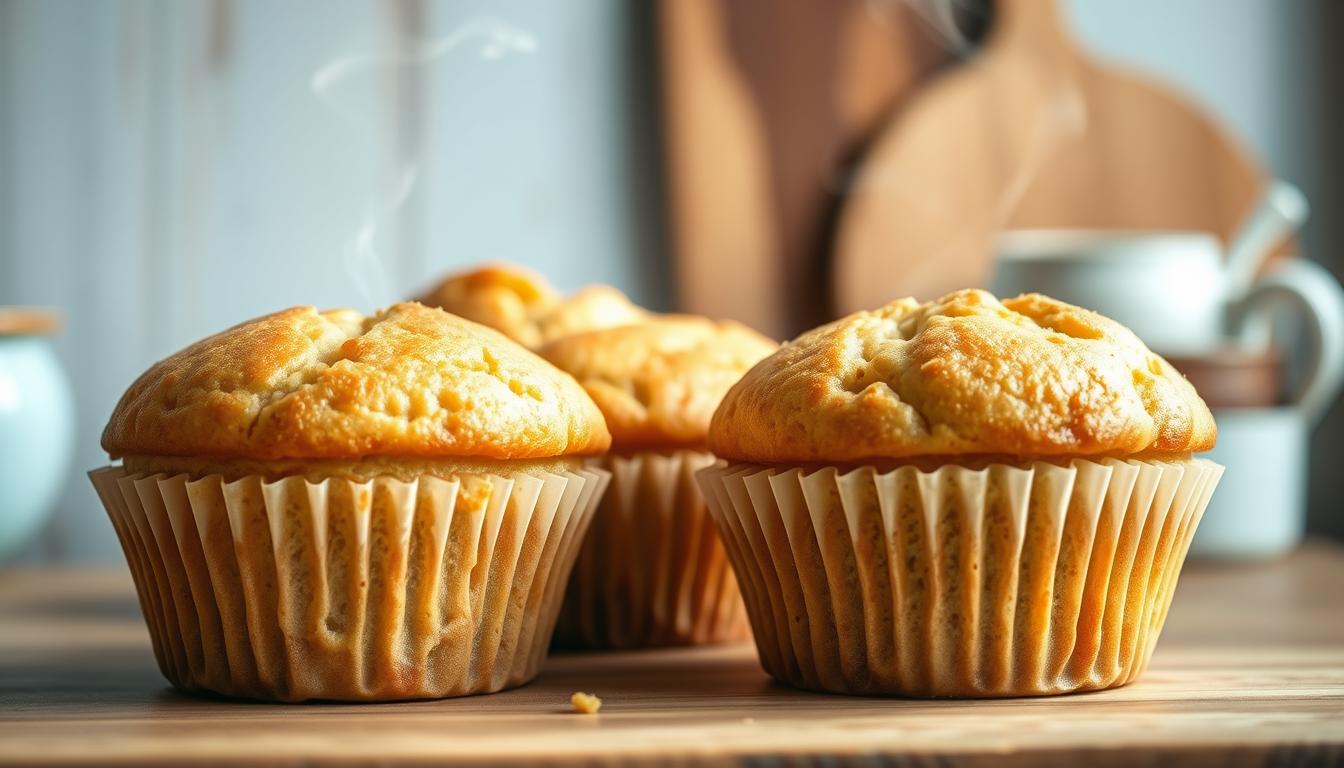
Making Protein Breakfast Muffins Greek Yogurt: A Step-by-Step Guide
I nearly threw out my favorite mixing bowl last winter after a failed attempt at “quick” blueberry bars. Now, it’s the hero of this recipe. Let’s walk through the process that’ll make your kitchen smell like a cozy café—without the stress.

Start by mashing one ripe banana in your large bowl until no chunks remain. Add ½ cup of strained yogurt, one egg, and two tablespoons of maple syrup. Whisk until smooth—this is your wet ingredients base. The goal? A silky texture that hugs the dry components later.
In a separate dish, combine 1 cup oat flour, ¼ cup vanilla protein powder, 1 tsp baking soda, and a pinch of salt. Sprinkle these dry ingredients into the wet mixture in three parts. Stir gently after each addition—think folding laundry, not beating eggs. Overmixing leads to dense results, and we’re after cloud-like fluff here.
“The batter should look like melted ice cream—thick but pourable. If it clings to your spoon, add a splash of milk.”
Scoop into lined muffin tins, filling each cup ¾ full. Bake at 350°F for 16-18 minutes. Let them cool completely before storing. Follow these instructions closely, and you’ll nail the texture every time. Bonus? Minimal cleanup means more morning peace.
Preparation and Baking Process
Last month, my neighbor texted me in a panic—her oven was preheating, but she forgot to line the tin. Been there. Let’s avoid that scramble with a foolproof roadmap to golden, tender results every time.
Mixing Wet and Dry Ingredients
Use a large spoon, not a mixer. Overzealous blending creates tough crumbs. Fold dry into wet ingredients until just combined—streaks of flour are okay. The batter should look lumpy, like cottage cheese with pockets of flour. This prevents overworking the proteins.
Baking Temperatures and Timing
Preheat your oven to 350°F before mixing ingredients. Cold ovens cause uneven rises. Here’s what I’ve learned through 12 batches:
- Line every cup with parchment or nonstick spray-coated liners—no skipping, even if your tin claims to be “nonstick”
- Divide batter using a ¼-cup measure for uniform size
- Bake 17 minutes exactly. Set a timer—distractions lead to dry edges
- Test with a toothpick at 16 minutes. If it comes out clean, pull them early
Pro tip: Rotate the pan halfway through baking if your oven has hot spots. Let cool 10 minutes before transferring—they firm up as they rest. Trust the process, even if they seem soft at first.
Tips for Achieving Moist and Fluffy Texture
We’ve all pulled baked goods from the oven that looked perfect—until they crumbled like sand. Through trial and error (and a few hockey-puck fails), I’ve nailed down tricks that guarantee tender results every time. Let’s talk about the sweet spot between technique and intuition.

Moisture-Boosting Hacks
That toothpick test? It’s your best friend. Insert it near the center—if it comes clean with just a few crumbs, pull the batch immediately. Overbaking zaps moisture faster than you can say “dessert disaster.” Let your treats rest in the pan for 5 minutes, then transfer to a wire rack. A designated cooling area prevents soggy bottoms from trapped steam.
One secret weapon: a teaspoon of vanilla. It enhances flavor without weighing down the crumb. For reheating, 10-15 microwave seconds revives day-old goods beautifully. Just cover them with a damp paper towel to lock in softness.
Avoiding Overmixing and Overbaking
During prep, mix wet and dry ingredients until just combined—streaks of flour are okay. I stir with a spatula using wide, gentle folds, like tucking a blanket around the batter. Overworking activates gluten, turning clouds into bricks.
Set timers religiously. Ovens lie. Mine runs hot, so I check at the 15-minute mark. As my grandma always said: “Better under than over—you can’t undo dryness.” Follow these steps, and you’ll master the art of tender baking without second-guessing.
Exploring Recipe Variations and Customization Options
My cousin once asked if these handheld treats could work for her gluten-free, dairy-free household. After three test batches (and one hilarious coconut flour explosion), we cracked it. This recipe isn’t just flexible—it’s a blank canvas for your cravings and dietary needs.

Vegan, Keto, and Gluten-Free Adaptations
For plant-based versions, swap the egg with a flax “egg” (1 tbsp ground flax + 3 tbsp water). Use coconut yogurt instead of dairy—just add 1 tsp lemon juice to mimic tanginess. Keto fans can replace oat flour with almond flour and use monk fruit sweetener. Gluten-free? Stick with certified GF oat flour—it works like a charm.
Creative Mix-Ins and Flavor Twists
Fold in these ingredients during the final stir:
- Dark chocolate chips (70% cacao for bittersweet balance)
- Fresh blueberries tossed in tapioca starch to prevent sinking
- Toasted walnuts or pecans for crunch
“Chopped dark chocolate bars create melty pockets—way better than uniform chips!” — @BakeItTillYouMakeIt
Reader comments reveal genius swaps: mashed sweet potato instead of banana, or adding orange zest for citrus flair. Every tweak keeps the core promise: tender texture with hidden nutrition. Want more ideas? Scroll through recipe reviews—you’ll find 27 tested variations (including a pumpkin spice version that’s pure autumn magic).
Storage, Freezing, and Reheating Recommendations
I learned the hard way why storage matters. Last summer, I left a batch uncovered overnight—they turned into dry, crumbly hockey pucks by dawn. Now, I treat these handheld gems like fresh flowers: protect them, and they’ll stay vibrant for days.

Best Practices for Airtight Storage
Use a container with a tight seal. Glass or BPA-free plastic works best. Layer muffins with parchment paper to prevent sticking. At room temperature, they’ll stay soft for 2 days. Need longer? Refrigerate for up to 5 days—the chilled environment locks in moisture.
| Storage Method | Duration | Key Tip |
|---|---|---|
| Airtight Container | 3 days | Add bread slice to absorb excess moisture |
| Freezer Bag | 3 months | Wrap individually in cling film first |
| Fridge | 5 days | Place paper towel under lid |
How to Reheat for Maximum Freshness
Microwave 10 seconds for softness. Prefer crisp tops? Use a toaster oven at 300°F for 4 minutes. Frozen? Thaw overnight in the fridge first. One reader shared: “I pop them frozen into my lunchbox—they’re perfectly thawed by mid-morning snack time.”
These methods keep your treats tasting bakery-fresh. Whether you’re rushing to work or packing lunches, smart storage means always having a tender bite ready.
There’s a quiet joy in pulling golden-crowned treats from the oven, knowing they’re as nourishing as they are tender. We’ve walked through everything—choosing the right ingredients, mastering the mix-and-fold technique, and storing them for grab-and-go ease. That tangy dairy staple? It’s your MVP, lending moisture and structure without heaviness.
Remember: gentle stirring keeps crumbs cloud-soft, and timers are your allies against overbaking. Tuck cooled batches into airtight containers, and they’ll stay fresh for days. My kids sneak them as snacks, but I love pairing one with coffee for a midday reset.
Feel free to riff on flavors. Swap mashed banana for pumpkin puree in fall, or add dark chocolate chips for bittersweet pockets. One reader even used zucchini shreds for extra veggie power! Each tweak proves how adaptable this base recipe truly is.
Whether your first batch emerges flawless or slightly lopsided, celebrate the progress. Cooking’s about discovery—and these handheld gems make every lesson delicious. Now go preheat that oven. Your future self will thank you.
Mocha Almond Greek Yogurt Muffins
These high-protein mocha almond muffins combine the richness of cocoa, the energizing touch of espresso, and the nourishing power of Greek yogurt. Ideal for busy mornings or post-workout fuel, they’re naturally sweetened and freezer-friendly.

Nutrition Information
Equipment Needed
- Mixing bowl
- Whisk
- Spatula
- Muffin tin
- Parchment liners or spray
Ingredients
-
1 ripe banana, mashed
-
1/2 cup plain Greek yogurt (2%)
-
1 large egg
-
2 tbsp maple syrup
-
1/4 cup unsweetened almond milk
-
1 tsp vanilla extract
-
1 tsp instant espresso powder
-
1 cup almond flour
-
1/4 cup chocolate protein powder
-
2 tbsp unsweetened cocoa powder
-
1 tsp baking powder
-
1/4 tsp baking soda
-
1/4 tsp salt
-
1/4 cup chopped almonds
-
1/4 cup mini dark chocolate chips (optional)
Instructions

Recipe Video
It Taste Cheese Cake! Gluten-Free Almond Yogurt Muffin
I Can't Believe this Muffin that taste Cheese cake without using any Cheese or cream Cheese, The almond Powder is very perfect combination to this.