Make Ahead Breakfast Frittata Slices With Seasonal Vegetables
Simplify your morning with our make ahead breakfast frittata slices recipe, loaded with seasonal veggies. Batch prep for a stress-free week.
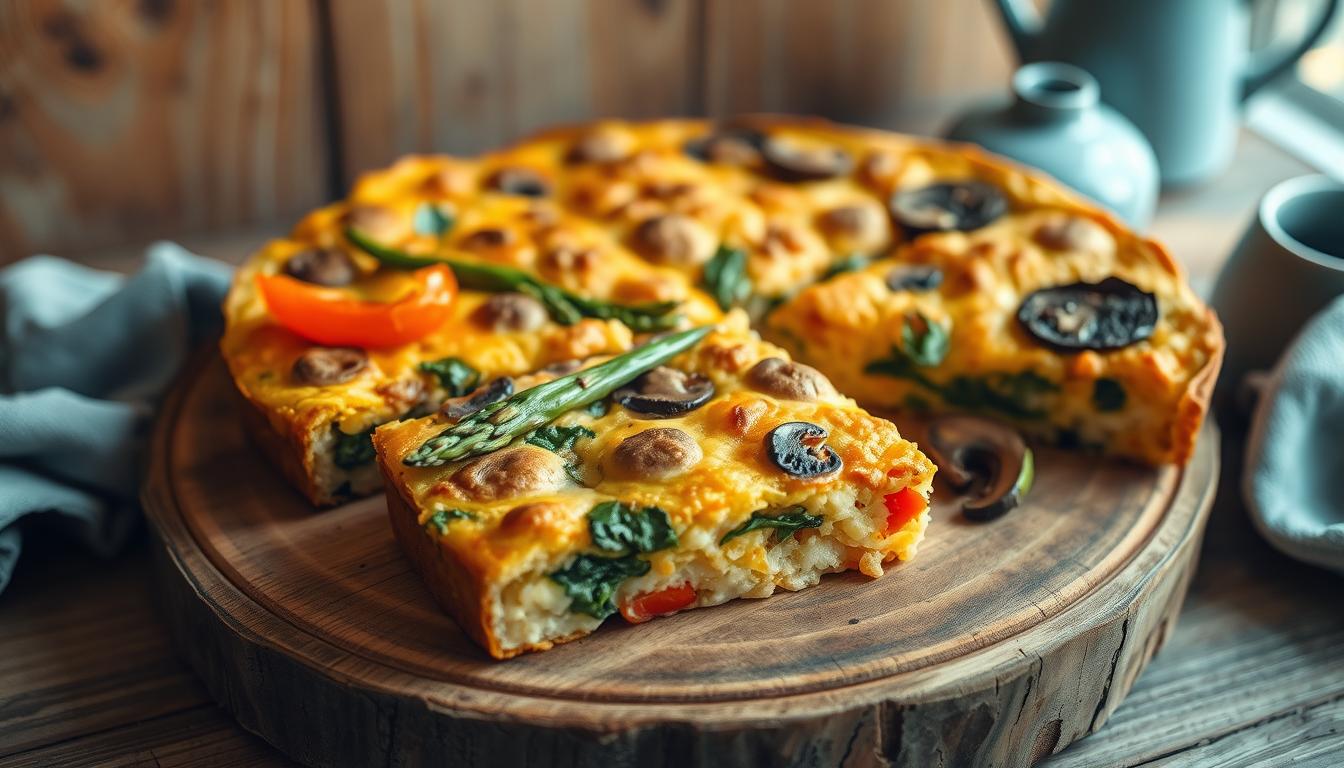
I used to dread weekday mornings until I discovered the magic of batch-prepped egg dishes. Now, my fridge always holds golden, veggie-packed squares ready to reheat in seconds. This isn’t just about saving time—it’s about savoring farm-fresh ingredients while giving your body steady energy.
Our custardy base combines pasture-raised eggs with a splash of cream and two cheeses for richness that feels indulgent. Seasonal veggies shine here: think summer zucchini, autumn kale, or spring asparagus. Pair them with our seasonal produce guide to maximize flavor and nutrients without extra effort.
These portable squares work for rushed breakfasts, lazy brunches, or even light dinners with a salad. They freeze beautifully, so you’ll always have a wholesome option when plans change. I’ve watched this recipe become a lifeline for parents, professionals, and anyone craving structure in their week.
Introduction: The Appeal of Make Ahead Breakfast Frittata Slices
Mornings transformed for me when I found a solution that marries convenience with farm-fresh flavors. Picture golden squares of creamy egg custard studded with colorful veggies – ready in minutes but tasting like weekend brunch.

Your Secret Weapon Against Chaotic Mornings
This dish thrives on simplicity. Whisking pasture-raised eggs with cream and two cheeses creates a velvety base that clings to every vegetable. I sauté greens or roast roots first (try bacon drippings for smoky depth), then pour the mixture into a skillet. The oven does the rest, leaving you free to pack lunches or sip coffee.
Nature’s Flavor Calendar
Seasonal picks aren’t just trendy – they’re tastier and often cheaper. Summer brings sweet corn and blistered tomatoes, while winter offers earthy mushrooms and kale. These choices add crunch, sweetness, or brightness to each bite. Pre-cooked veggies mean no soggy textures, just layers of flavor.
What seals the deal? Reheating a slice takes less time than brewing tea. The edges stay crisp from the oven finish, while the center stays luxuriously soft. It’s meal prep that actually excites your taste buds – and saves your sanity.
Ingredients and Prepping Your Egg Mixture
Great meals start with quality components. Let’s build your foundation for golden, custardy squares that hold their shape but melt in your mouth. Every choice here matters – from egg freshness to how you chop those veggies.

Essential Ingredients: Eggs, Heavy Cream, and Cheese
Pasture-raised eggs create that rich golden hue. Heavy cream adds silkiness (swap milk for a lighter version). Cheese does double duty: sharp cheddar brings tang, while parmesan adds salty depth. Combine them like this:
- 12 large eggs
- ½ cup heavy cream
- 1 cup shredded cheese blend
Pro tip: Let eggs sit at room temperature for 10 minutes before whisking. Cold eggs take longer to blend smoothly.
Seasoning and Vegetable Prep Tips
Chop veggies uniformly – aim for ½-inch pieces. Sauté onions first until translucent, then add firmer vegetables like carrots. Leafy greens go in last. Always season in layers:
- Salt vegetables while cooking
- Add pepper and garlic powder to the egg mix
- Finish with fresh herbs after baking
Preheat your oven to 375°F while prepping. A 10-inch cast iron skillet works best – its even heat prevents burnt edges. Measure cream precisely (use liquid cups) and set a timer for 25-28 minutes. Trust me, it’s foolproof.
Step-by-Step Cooking Process
Perfecting this dish starts with layering flavors through intentional technique. I’ll walk you through each phase – no chef skills required, just a good pan and attention to detail.

From Sautéing Vegetables to Whisking the Egg Mixture
- Heat a 10-inch skillet over medium. Add 1 tbsp bacon drippings (or olive oil) until shimmering. Toss in chopped veggies – start with onions, then firmer items like peppers. Cook 5 minutes until edges caramelize.
- While vegetables soften, whisk 12 eggs with ½ cup cream in a large bowl. Use a folding motion – overmixing creates tough texture. Stir in 1 tsp salt and ¼ tsp black pepper.
- Spread cooked vegetables evenly across the skillet’s base. Pour egg mixture slowly, letting it seep between gaps. Jiggle the pan gently to eliminate air pockets.
Caramelization matters here. Those golden-brown bits add smoky depth that permeates every bite. Let the eggs settle untouched for 2 minutes before transferring to the oven.
Timing is everything. Set your timer for 25 minutes at 375°F. The top should puff slightly and turn golden without drying out. Cool 10 minutes before slicing – this prevents crumbling.
Store portions in savory breakfast meal prep containers for grab-and-go ease. Reheat at 50% power to maintain that custardy center we all crave.
Stovetop-to-Oven Technique: Getting It Right
Mastering the stovetop-to-oven method unlocks restaurant-quality results at home. This approach builds flavor layers while preventing rubbery textures – the secret to custardy centers with caramelized edges.

Using a Cast Iron Skillet for Even Cooking
Your pan choice makes all the difference. Cast iron’s heat retention creates that golden crust we crave while gently setting the eggs. Start with medium heat to sauté veggies like bell peppers and mushrooms until they release their sweetness. Spinach wilts perfectly in the residual warmth before adding the egg mixture.
Here’s why this combo works best:
| Cookware | Heat Distribution | Oven-Safe Temp | Non-Stick Qualities |
|---|---|---|---|
| Cast Iron | Excellent | 500°F+ | Improves with use |
| Stainless Steel | Uneven | 400°F | Requires more oil |
| Non-Stick Pan | Average | 350°F | Degrades over time |
Always use oven mitts – that handle gets HOT. Slide the skillet into a preheated 375°F oven immediately after stovetop cooking. The sudden heat surge stops overcooking while setting the structure. For brunch gatherings, let the skillet cool slightly before slicing – it holds heat longer than other pans.
Pro tip: Wrap the handle in a thick towel after baking. This reminds everyone it’s still dangerous to touch, even when serving family-style.
Mastering make ahead breakfast frittata slices
Batch cooking becomes effortless when you understand your tools and timing. Let’s transform your weekly routine with a strategy that balances flavor and practicality.

Planning Your Prep and Batch Cooking
Sunday afternoons are my secret weapon. I dedicate 45 minutes to chopping vegetables and whisking eggs with heavy cream – that velvety base stays creamy even after freezing. Pour the egg mixture into a hot cast iron skillet already layered with caramelized veggies. The seasoned surface prevents sticking while creating those crisp edges we crave.
Here’s why this works:
- Pre-cooked vegetables eliminate excess moisture
- Heavy cream maintains texture during reheating
- Cast iron distributes heat evenly for consistent results
Season generously with salt and pepper at each stage. Sauté veggies until tender, then let them cool slightly before adding eggs. I store cooled squares in gluten-free breakfast meal prep containers for quick access. They keep 4 days refrigerated or 3 months frozen.
For best results, reheat slices in a toaster oven at 325°F. The edges regain their crunch while the center stays luxuriously soft. Trust me – your future self will thank you when hectic mornings strike.
Customizing Your Frittata with Creative Variations

Your kitchen becomes a flavor lab with this endlessly adaptable dish. I love tossing in whatever proteins and cheeses I have on hand – it’s like a weekly edible adventure that never gets boring.
Protein & Cheese Swaps That Sing
Crumbled bacon adds smoky crunch, while diced ham brings comforting familiarity. For special occasions, fold in flaked smoked salmon during the last bake minutes. Cheese transforms everything:
- Mozzarella creates stretchy pockets
- Gruyère offers nutty sophistication
- Feta provides salty tang
Always pre-cook proteins at medium heat to avoid sogginess. Pat them dry before mixing into your egg base.
Herb & Spice Magic Tricks
Fresh basil brightens summer versions, while rosemary anchors heartier winter combinations. Try this trick: mix chives into the batter, then sprinkle thyme over baked individual slices. For depth, add smoked paprika or cumin to your egg mixture.
Halve cherry tomatoes vertically – their jewel-like cross-sections look stunning when you pour egg mixture around them. Let creations bake 2-3 extra minutes if adding watery veggies. This helps set the structure while blending flavors.
Every batch becomes a new experience. Last week’s Mediterranean-inspired frittatas with olives and feta morphed into this morning’s Southwest version with chorizo and pepper jack. What will your next combination be?
Tips for Storing and Reheating Your Frittata Slices
Discovering the perfect storage method transformed my meal prep game. Proper handling ensures every bite stays as satisfying as when it first left the oven – no rubbery textures or flavor loss allowed.

Smart Storage Solutions
Cool baked portions completely before transferring. I use glass containers with tight seals – they prevent odors and maintain moisture better than plastic. For freezing:
- Wrap individual squares in parchment paper
- Stack them in freezer bags labeled with dates
- Add a silica gel packet to absorb excess humidity
Refrigerated slices keep 4 days. Frozen ones stay fresh 3 months – perfect for unexpected guests or hectic weeks.
Reviving That Fresh-Baked Magic
Low and slow wins the reheating race. My go-to methods:
- Oven: 300°F for 8-10 minutes on a parchment-lined sheet
- Microwave: 30 seconds at 50% power with a damp paper towel
Add a splash of milk or cream before warming to restore creaminess. One reader shared: “The microwave trick changed everything – my squares taste oven-fresh again!”
Always let reheated portions rest 2 minutes. This allows the custard to redistribute moisture evenly. For extra crispness, finish under the broiler for 60 seconds.
Conclusion
Wholesome mornings begin with smart prep. These golden egg squares deliver nutrition and flavor while adapting to your schedule. With quality ingredients and simple methods, you’ll create meals that fuel busy days without compromising taste.
Your cast iron skillet becomes the hero here. Its even heat ensures creamy centers and crisp edges every time. Remember: precise oven timing (375°F for 25-28 minutes) locks in that perfect custard texture we all love.
Play with fresh combinations. Roasted garlic adds earthy warmth, while sun-kissed tomatoes bring summer brightness to each bite. Swap proteins or cheeses based on what’s seasonal – your taste buds will thank you.
Meal prep shouldn’t feel like a chore. With this strategy, you’re building routines that nourish both body and routine. Share your favorite twists online – let’s inspire each other to cook smarter, not harder.