Freezer Breakfast Sandwiches Toaster Method For Crispy Results
Get your mornings started with our freezer breakfast sandwiches toaster method. Follow our step-by-step guide for a stress-free breakfast prep.
What if I told you your morning rush could include a hot, crispy breakfast sandwich without the drive-thru line? As someone who’s burned more than a few rushed omelets, I’ve learned that smart prep beats chaotic mornings. The secret? A clever reheating trick that keeps your meal tasting fresh-baked—even after weeks in the freezer.
These handheld meals shine because they’re built for real life. English muffins hold up beautifully when frozen, avoiding the dreaded soggy bread syndrome. Combine them with fluffy baked eggs and melty cheese, and you’ve got a morning win. I’ve tweaked my make-ahead breakfast sandwich recipe over dozens of test batches to ensure every component reheats perfectly. No rubbery textures here—just golden, toasty edges that crunch like they’re straight from the café.
Why this works:
- Crispy results in under 10 minutes with the right reheating technique
- Simple ingredients you can adapt to dietary needs
- Weekly prep becomes a 45-minute weekend project
Introduction to Freezer Breakfast Sandwich Creations
Remember that time I tried reheating a store-bought breakfast wrap? Let’s just say the microwave turned it into a rubbery mess. That’s when I discovered the magic of reviving meals properly. The trick lies in balancing heat and texture—something most reheating methods get wrong.
Why Your Appliance Matters

Not all kitchen tools are created equal for reviving frozen meals. While microwaves zap moisture and ovens take forever, a simple countertop hero delivers golden edges. One test batch with slightly stale bakery muffins taught me this: gentle, direct heat brings back that fresh-from-the-bakery crunch better than any other method.
Meal Prep That Actually Works
I’ve learned through trial (and many errors) that success starts before you even wrap your creations. Opt for thick-cut beef bacon that crisps when reheated, and cheeses that melt smoothly without separating. Freshly baked muffins with sturdy nooks hold up best against condensation during storage.
| Reheating Method | Texture | Time | Convenience |
|---|---|---|---|
| Toaster | Crispy exterior | 8 minutes | Set-and-forget |
| Oven | Even heating | 15 minutes | Requires monitoring |
| Microwave | Soggy results | 2 minutes | Quick but messy |
Wrapping each portion in parchment paper became my aha moment. It prevents freezer burn without trapping steam—crucial for maintaining those perfect cheese pulls. Now when my alarm snoozes three times, I know I’m still minutes away from a satisfying meal that tastes freshly made.
Choose quality ingredients and proper tools for best results. Prep smart to avoid soggy sandwiches later.
Essential Ingredients and Equipment for a Quick Breakfast
Last Tuesday, I stared into my fridge and found half a jar of pickles and expired yogurt—definitely not sandwich material. That’s when I learned the golden rule: great meals start with intentional shopping. Your ingredients don’t need to be fancy, but they should work together like old friends.

Must-Have Ingredients
Start with farm-fresh eggs—their richer yolks create fluffier layers. Thick-cut beef bacon adds crunch that survives freezing, while sharp cheddar melts smoothly without oil separation. For the base, choose bakery-style English muffins with those signature nooks that trap melted butter. As my butcher once told me:
“Good meat doesn’t need a backup singer—it’s the star of the show.”
Swapping ingredients keeps things exciting. Try applewood-smoked turkey slices or peppered havarti cheese. Even a simple change like whole-grain bread instead of muffins can transform your morning routine.
Recommended Kitchen Tools
My trusty biscuit cutter became the MVP for shaping eggs into perfect rounds. A heavy ceramic baking dish ensures even cooking, while a silicone whisk prevents scrambled eggs from sticking. For reheating? That countertop microwave you rarely use becomes a time-saving hero when paired with parchment wraps.
Here’s what I keep within arm’s reach:
- Glass mixing bowls (they don’t retain odors)
- Parchment paper squares for mess-free wrapping
- A sharp serrated knife for splitting muffins
With these basics, you’ll spend less time searching drawers and more time savoring that first bite. The best part? You likely own most of these tools already—they’re just waiting to become breakfast champions.
Step-by-Step Egg Preparation and Baking Techniques
I once served rubbery scrambled eggs to my in-laws. Mortifying? Absolutely. Now I bake eggs in parchment-lined pans—game changer. The key lies in treating eggs like delicate custard rather than construction material.

Tips for Perfectly Baked Eggs
Start with 8 large eggs whisked until ribbons form. Add ¼ teaspoon salt and ½ teaspoon pepper—the exact measurements matter here. A splash of whole milk creates air pockets that prevent dense textures. As my chef friend insists:
“Eggs need room to breathe. Crowd the pan, and you’ll get shoe leather instead of clouds.”
Grease your pan with butter, not oil. Butter’s water content steams eggs gently during baking. Set your oven to 325°F—any hotter, and edges toughen before centers set. Bake 18-22 minutes until the center jiggles slightly when shaken.
Test doneness with a paring knife. Clean blade? Pull the pan. Wet streaks? Give it 90 more seconds. Cool eggs completely before slicing into rounds. This resting period lets proteins relax, ensuring tender reheating later.
Avoid these common pitfalls:
- Overmixing creates tough layers (10 stirs max)
- Baking straight from fridge causes uneven cooking
- Slicing warm eggs leads to crumbly edges
Stack your cooled egg rounds with cheddar slices in a gallon bag, separated by parchment. Properly baked eggs become velvety pillows after reheating—the secret heart of every great handheld meal.
freezer breakfast sandwiches toaster method: Assembly and Reheating Strategies
Last month, I nearly missed a work call while scrambling to heat up my morning meal. That’s when I perfected this assembly line approach. Start by splitting your english muffin and layering components like building blocks: egg round first, then cheese, followed by cooked sausage or beef bacon. Press gently—you want the cheese to act as glue between layers.

Toaster Oven Advantages
Your countertop hero works magic here. Set to 375°F and reheat frozen stacks for 8-10 minutes. The dry, radiant heat revives the english muffin’s crunch while melting cheese evenly. As my neighbor (a retired diner cook) says:
“Golden edges don’t lie—they’re the mark of proper heat distribution.”
Microwaving without care may result in a soggy or unevenly reheated sandwich. Follow the correct method for best texture.
Microwave and Oven Reheating Options
Short on time? Wrap your creation in a paper towel and microwave for 90 seconds. Make sure to let it sit 1 minute afterward—this steam release prevents sogginess. For groups, bake multiple portions at 350°F for 15 minutes. The oven method shines when reheating 4+ sandwiches freezer-stored meals.
Real-life reheating tips:
- Thaw overnight in the fridge for faster morning prep
- Add fresh spinach or tomato slices after heating
- Use foil packets for oven batches to save cleanup time
Whether you’re racing out the door or savoring a slow morning, these strategies deliver that just-made texture. The english muffin stays crisp, the cheese stays gooey, and you stay fueled.
Perfect your reheating method to enjoy crispy, fresh results every time, no matter the time crunch.
Creative Variations with English Muffins, Meat, and Cheese
My cousin’s picky eater once declared war on “orange cheese”—until we swapped in pepper jack. That’s when I realized: Your morning meal should spark joy, not feel like a chore. The beauty of this formula? It’s a blank canvas waiting for your personal touch.

Mix-and-Match Magic
Think beyond basic beef bacon. Smoky turkey slices add lean protein punch, while applewood sausage crumbles bring cozy diner vibes. Cheese choices matter too—sharp white cheddar melts beautifully, and havarti creates that Instagram-worthy stretch. As one Prepistry member shared:
“Swapping in jalapeño-cheddar biscuits transformed my routine into something I crave!”
Don’t overlook the base. While classic muffins work, everything bagels add garlicky crunch. For gluten-free friends, toasted sweet potato rounds hold toppings surprisingly well. Even your egg mixture can shine—try whisking in chives or a splash of milk for extra fluff.
Three simple ways to reinvent your creation:
- Meat swap: Canadian beef bacon for salty-sweet balance
- Bread experiment: Pretzel rolls or sourdough English muffins
- Flavor boost: Pesto smear or hot honey drizzle
The best part? Your twists become new family favorites. Snap a photo of your masterpiece and tag #PrepistryEats—we’ll feature the most inventive combos next month!
Smart Freezing and Storage Techniques for Busy Mornings
Last winter, I opened my freezer to find a sad, frost-covered creation that resembled cardboard more than food. That disaster taught me proper storage isn’t just about space—it’s about preserving flavor and texture. With these techniques, your prepped meals stay as vibrant as the day you made them.
Best Wrapping Practices

Individually wrap each portion like you’re tucking it into bed. Parchment paper creates a breathable barrier, while foil blocks light that causes flavor loss. For bagel-based meals, place wax paper between the halves to prevent sticking. As a local bakery owner once advised me:
“Treat frozen food like fresh flowers—protect it from harsh elements, and it’ll bloom again later.”
Freezer Storage Tips
Organize wrapped portions upright in gallon bags—they stack like library books. Use permanent markers to note contents and dates (“beef & Swiss on Rye – 3/14”). Thaw overnight in the fridge for even heating. For bag lovers: squeeze air from bags before sealing to prevent icy crystals.
Proven strategies:
- Rotate older meals to the front weekly
- Freeze beef slices separately for quicker reheating
- Place parchment between bagel halves to maintain texture
Sunday prep becomes a gift to your future self. When your alarm blares, you’ll grab satisfaction from the cold instead of chaos.
Incorrect wrapping and storage can lead to freezer burn and soggy textures—ensure proper packaging.
Just last week, my neighbor texted me a photo of her golden-brown creation—”Better than the coffee shop!” she wrote. That’s the power of nailing your meal prep rhythm. You’ve mastered baking eggs in buttered pans, layering smart proteins, and wrapping with care. Now comes the reward: biting into that crisp exterior knowing you outsmarted another chaotic morning.
The real magic happens when you trust the process. That 1/4 cup of shredded cheese melting into fluffy eggs? The way melted butter revives bakery bread? These small wins add up. I’ve seen countless readers transform their routines by sticking to three rules: prep components separately, use parchment religiously, and always reheat with patience.
Your turn to shine. Swap in that sharp gouda or add half-cup spinach for extra greens. Share your review of which combos keep you fueled longest—our community thrives on real-life tweaks. Tag creations with #MorningWinMaker so we can celebrate your kitchen victories together.
Never underestimate what balanced protein and a little planning can do. Whether it’s applewood beef bacon or veggie sausage, that protein-packed base fuels your day right. Drop your favorite twists in our reviews section—your idea might become someone else’s morning salvation.
Here’s to savoring butter’s richness without weekday stress. You’ve got this.
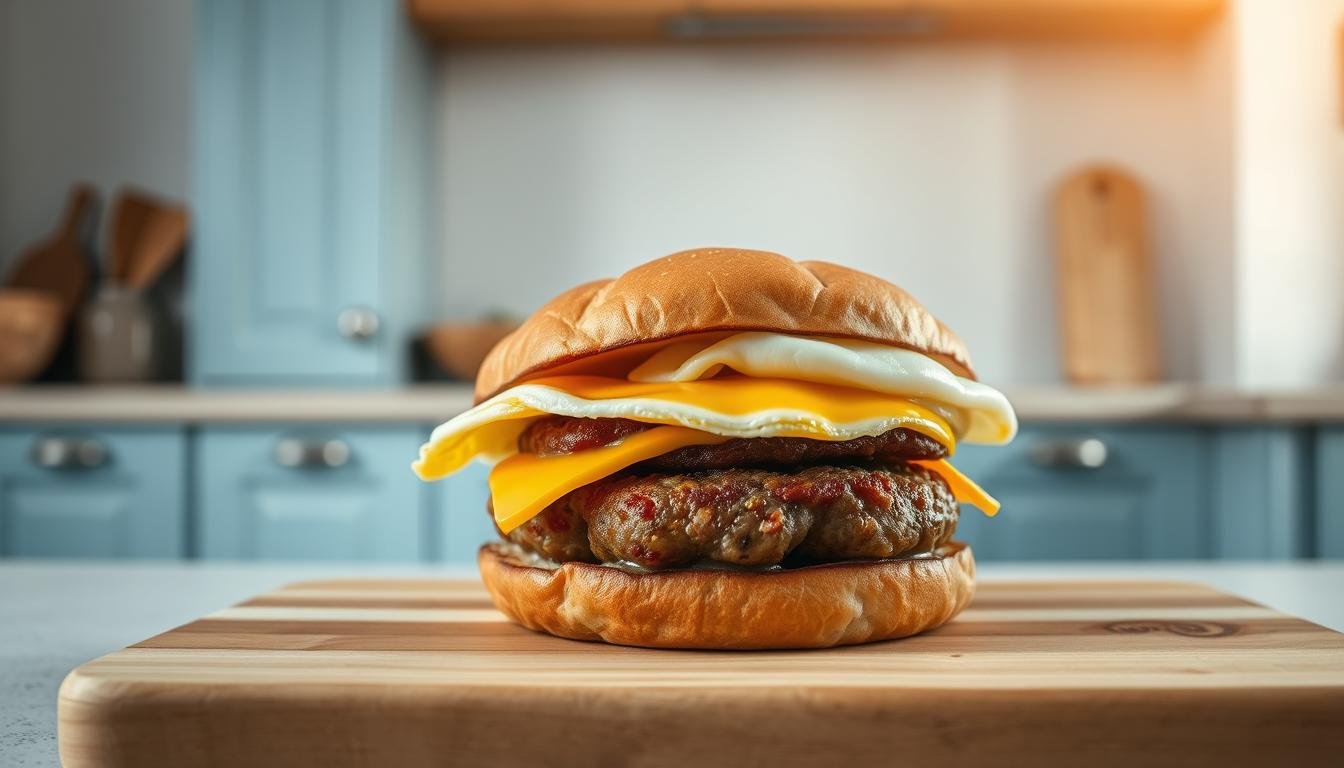
Freezer-Friendly Crispy Beef Bacon & Cheddar Breakfast Sandwiches
Golden English muffin sandwiches with fluffy baked eggs, crispy beef bacon, and melty cheddar - prepped ahead and reheated to perfection in minutes.

Nutrition Information
Equipment Needed
- Baking sheet
- Muffin tin or round cookie cutters
- Parchment paper
- Toaster oven
Ingredients
-
6 bakery-style English muffins
-
8 large eggs
-
¼ cup whole milk
-
½ tsp black pepper
-
½ tsp salt
-
12 slices thick-cut beef bacon
-
6 slices sharp cheddar cheese
-
2 tbsp butter (for greasing)
Instructions

Recipe Video
BEST Meal Prep Breakfast Sandwiches for the Freezer (Low Calorie High Protein)
Here's how I meal prep breakfast sandwiches for the freezer so that I can have them ready to go in the mornings! These breakfast sandwiches are a low-calorie, high-protein choice that makes dieting just a little more fun.