Freezer Breakfast Sandwiches Foil Wrapped For Perfect Storage
“Get your mornings on track with our guide on making freezer breakfast sandwiches foil wrapped. Prep, freeze, and enjoy!”
I’ve burned more rushed omelets than I care to admit while scrambling to feed my family on chaotic weekday mornings. Then I discovered a trick that changed everything: pre-assembled handheld meals that reheat like they’re fresh. The secret? A storage method that locks in texture while streamlining your routine.
These portable morning staples combine baked eggs and crispy English muffins – two elements that hold up beautifully when frozen. You’ll find endless options for fillings (turkey bacon? roasted peppers? plant-based cheese?), but the real magic happens during wrapping. A quick kitchen hack from Prepistry.com ensures each one stays perfectly intact, whether you’re reheating one or twelve.
- Effortless mornings: Grab a satisfying meal in 90 seconds flat
- Flavor freedom: Swap ingredients based on dietary needs or pantry staples
What surprised me most wasn’t the convenience – it was how the first bite still tastes like I’ve just cooked it. No rubbery eggs or soggy bread, just warm layers that make hectic days feel manageable. Let’s talk about building your own batch.
Freezer Breakfast Sandwiches
I once thought meal prep was for fitness buffs with too much time—until a Tuesday meltdown changed my mind. My youngest missed the bus while I frantically searched for clean pans. That’s when I committed to building a stash of ready-to-heat morning fuel. The solution? A cold-storage method that preserves textures better than my first attempts at Sunday casseroles ever did.

More Than Just Time Saved
Batch cooking these handheld meals does more than prevent burnt toast emergencies. Each one delivers 12g of protein from the egg base alone—nature’s perfect quick-energy source. Add sharp cheddar for calcium, or layer in spinach for iron. One reader told me, “My teens actually eat these instead of grabbing sugary snacks—victory!”
The Cold Truth About Freshness
Here’s what surprised me: properly wrapped, these stay delicious for up to 3 months. Baked eggs (not fried!) maintain their tender bite, while English muffins avoid that dreaded freezer sogginess. A chef friend shared why this works: “Slow freezing prevents large ice crystals—the enemy of texture.”
- Wake up to a warm meal in 90 seconds flat
- Customize fillings weekly without recipe overload
- Reduce food waste by using up leftover veggies
Last month, a nurse from Ohio emailed, “These got me through night shifts—finally eating something that doesn’t taste like cardboard.” That’s the real magic: nourishment that feels indulgent, even when life isn’t.
Getting Started with Ingredients and Tools
I learned the hard way that ingredient quality matters when my first batch stuck to the pan like cement. Let’s talk specifics – these elements make or break your meal prep game.
Essential Ingredients Overview
Your foundation starts with 12 large eggs (pasture-raised if possible) whisked with 1/4 cup milk. Add 1 tsp salt and 1/2 tsp pepper – this base works for 6 hearty portions. Choose sturdy English muffins; their nooks hold up better than bagels during freezing. For cheese, opt for slices rather than shredded – they create moisture barriers.

Recommended Kitchen Tools
A 9×13 pan changed my life – its depth prevents over-thin eggs. Grease it thoroughly with butter (not spray!) for easy release. An electric mixer isn’t essential, but it creates fluffier eggs in half the time. Digital scales prevent “eyeballing” disasters – I once used tablespoons instead of teaspoons…
Pro tip from my test kitchen: Bake at 325°F instead of scrambling. Lower heat = tender texture. One reader shared, “This method saved my rubbery-egg curse!” Prep your muffin halves first – toasting them lightly prevents sogginess later.
How to Make freezer breakfast sandwiches foil wrapped
I once burned an entire tray of baked eggs because I forgot to set a timer—proof that even simple steps need attention. Let’s walk through creating these portable meals without the guesswork. The key lies in treating each component with care, from the first whisk to the final wrap.

Preparing and Baking the Egg Base
Start by whisking 12 eggs with 1/4 cup milk—this creates a custardy texture that stays tender when reheated. Add a pinch of salt and pepper, but go light; you can adjust later. Preheat your oven to 325°F (163°C) while greasing a 9×13 pan with cooking spray. Pour the mixture in and bake for 18-22 minutes. Watch for edges pulling away from the pan—that’s your cue to pull them out.
Let the eggs cool slightly before slicing into six squares. A pizza cutter works wonders here. One reader shared, “Cutting them this way stopped my fillings from sliding out—game changer!”
Assembling the Sandwich with Your Favorite Fillings
Split English muffins and lightly toast them—this step prevents sogginess later. Layer each half with an egg square, a slice of cheddar, and your chosen protein. I prefer turkey sausage, but bacon or ham work too. Press gently to help the cheese bind everything together.
Pro tip: Let sandwiches cool completely before wrapping. Trapped steam leads to ice crystals. A nurse from Texas told me, “I assemble mine during nap time—they’re ready before my shift chaos begins.”
- Use cooking spray evenly to avoid sticking disasters
- Bake at lower temps for softer, non-rubbery eggs
- Layer ingredients while warm for better adhesion
Storing Your Breakfast Sandwiches for Optimal Freshness
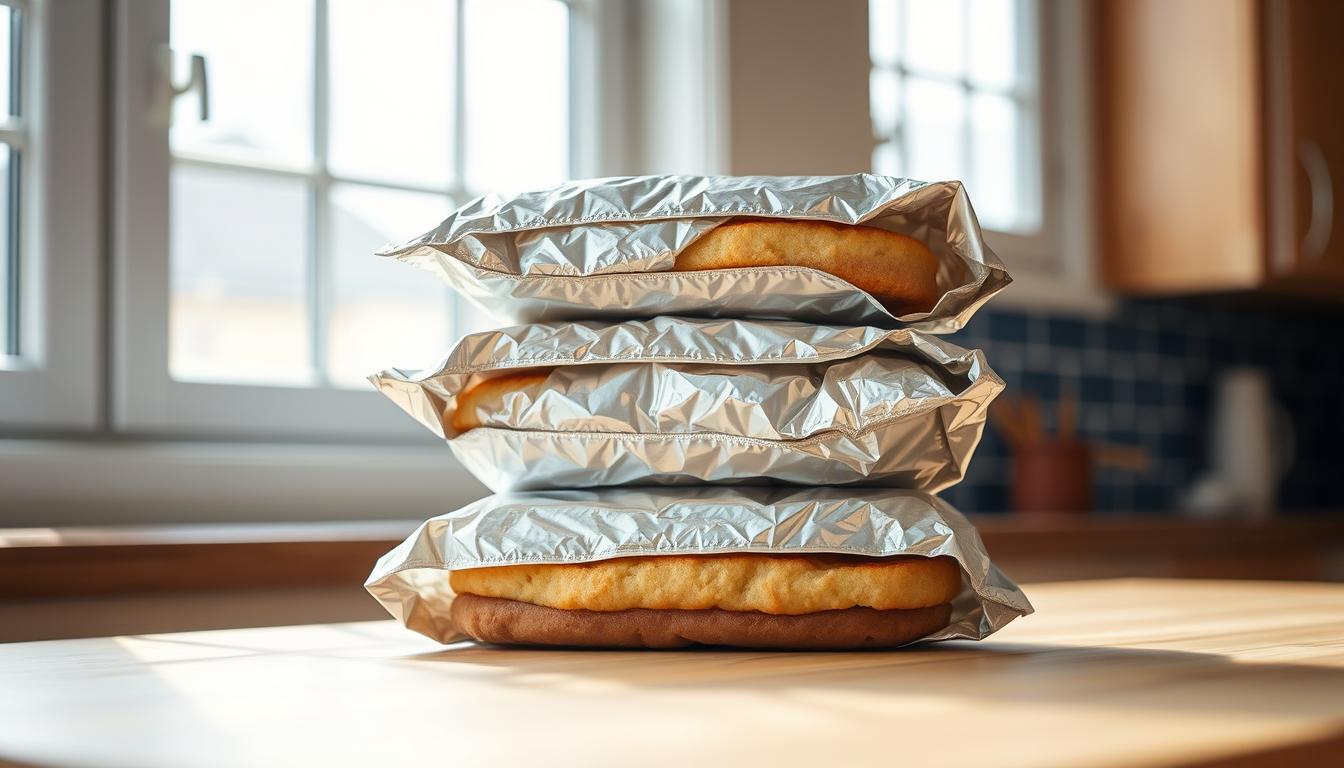
The first time I tried storing these, I used plastic wrap—big mistake. Woke up to frostbitten bread and sad, dried-out eggs. Now I use a three-step armor system that keeps every bite tasting like morning perfection.

Proper Wrapping Techniques: Foil, Parchment, or Wax Paper
Your wrapping choice determines texture survival. Through trial and error (and some hockey-puck muffins), here’s what works:
| Material | Best For | Storage Time | Notes |
|---|---|---|---|
| Aluminum Foil | Long-term storage | 3 months | Blocks air completely |
| Parchment Paper | Microwave reheating | 1 month | Prevents sticking |
| Freezer Paper | Moisture control | 2 months | Wax coating seals |
Wrap each one snugly like a burrito—no loose edges. I layer parchment under foil for double protection. A teacher from Arizona shared, “This combo saved my bacon-cheese versions from turning into sponges!”
Always use freezer-safe bags after wrapping. Squeeze out excess air before sealing. Label with dates and fillings: “Sausage-cheddar 11/5” or “Ham-spinach 11/12”. Rotate older batches to the front—your future self will thank you.
Safety tip: Let sandwiches cool completely before wrapping. Trapped steam invites ice crystals. Wash hands after handling raw meats like bacon or sausage during prep.
Reheating Techniques for a Delicious Morning Meal
My family’s morning sprint to the car used to involve at least one forgotten lunchbox—until we mastered the art of reheating. The key? Treating each method like a trusted kitchen tool rather than a last resort. Whether you’re feeding a crowd or fueling a solo adventure, these approaches keep your meal tasting like it just left the griddle.

Microwave Reheating Tips for Quick Meals
For those “I’m already late!” moments, start with 30 seconds on defrost. Wrap your sandwich in a paper towel to absorb excess moisture—this prevents rubbery eggs. Microwave another 45 seconds at 50% power. My kids swear this makes the cheese “ooze just right.”
Oven and Toaster Oven Reheating Methods
Sunday brunch calls for the oven method. Preheat to 350°F (177°C), place sandwiches on a baking sheet lightly coated with spray, and heat for 12-15 minutes. The result? Crispy edges that rival fresh-cooked bacon. A camping buddy once told me, “This tastes better than my campfire attempts!”
| Method | Time | Best For | Pro Tip |
|---|---|---|---|
| Microwave | 1:15 mins | Single servings | Paper towel barrier |
| Oven | 12-15 mins | Batch cooking | Use baking spray |
Both methods preserve the fresh crunch of veggies and prevent excess fat from pooling. My crew prefers oven-reheated versions for weekend hikes—they stay warm in foil packs for hours. For detailed temperature adjustments, check our partner’s guide.
Remember: Let sandwiches rest 1 minute after reheating. This lets heat distribute evenly, just like resting a steak. Now go conquer your morning—no cold bites required.
The first time I pulled a perfectly reheated protein-packed meal from the microwave, I knew meal prep had changed my life. Follow these simple instructions: whisk eggs, layer your favorites, and wrap each creation snugly. Whether you use a baking sheet for six portions or craft single servings, consistency delivers morning wins.
These frozen breakfast heroes adapt to any diet—swap cheeses or proteins without fuss. Experiment with different ways to wrap sandwiches using parchment or wax paper. Share your genius combos online—your ham-spinach version might trend in our Facebook group!
Storing ready-to-heat meals means grabbing nourishment in 90 seconds flat. Imagine sipping coffee while your oven revives that perfect egg texture—no chaos when the school bus arrives.
One Sunday batch gifts you five calm mornings. That’s the real magic: trading kitchen stress for extra hugs or focused work time. Your future self will toast to this smart strategy.
Freezer-Friendly Breakfast Pizza Pockets
These freezer-friendly breakfast pizza pockets are perfect for busy mornings. Filled with scrambled eggs, cheese, and your favorite breakfast meats, they can be made ahead and reheated in minutes.

Nutrition Information
Equipment Needed
- Baking sheet
- Parchment paper
- Mixing bowl
- Skillet
- Rolling pin
Ingredients
-
1 lb pizza dough
-
6 large eggs
-
1/4 cup milk
-
1 cup shredded cheddar cheese
-
1/2 cup cooked and crumbled bacon
-
1/4 cup diced bell peppers
-
1/4 cup diced onions
-
Salt and pepper to taste
-
1 tbsp olive oil
Instructions

Recipe Video
PEPPERONI PIZZA POCKETS || 4 WEEKS TO FILL YOUR FREEZER
Enjoy your pizza in sandwich form with these freezer-friendly Pepperoni Pizza Pockets! Fill with your favorite toppings for a delicious lunch or dinner!