Freezer Breakfast Sandwiches Flavored Spreads For Extra Taste
“Elevate your morning with our guide on making freezer breakfast sandwiches using delicious flavored spreads. Learn how to prep ahead for a stress-free morning!”
Three years ago, I nearly threw a plate of cold scrambled eggs at my kitchen wall. Mornings felt like a race I kept losing—until I discovered the magic of pre-portioned meals waiting in my freezer. Now? I sip coffee while my oven reheats something that tastes like it came from a cozy diner.
The secret lies in batch-baking eggs in a 9×13 pan (no more rubbery microwave textures!), then layering them with crispy bacon or savory turkey on toasted English muffins. A swipe of garlic-herb butter or spicy aioli transforms these from basic to brilliant. This method from Prepistry.com became my weekly ritual—15 minutes of assembly yields five days of mornings where I actually enjoy opening my fridge.
What you’ll learn:
- Why baked eggs beat stovetop scrambling for meal prep
- How to customize protein and cheese combos for varied flavors
- Storage tricks to prevent sogginess (hint: wax paper is key)
What surprised me most wasn’t the time saved—though gaining 20 minutes daily matters—but how something frozen could taste fresher than my rushed weekday cooking. It’s not about perfection; it’s about giving future-you a high-five every sunrise.
The Benefits of Freezer Breakfast Sandwiches
Last winter, my mornings felt like a never-ending scramble—until I discovered the quiet power of Sunday prep work. Social media threads buzzed with parents and professionals swearing by frozen handheld meals that reheat in minutes. One TikTok creator put it perfectly: “Your future self will kiss past-you when that microwave dings.”

Batch Cooking Beats Daily Chaos
Here’s what works in my kitchen: Whisk 12 eggs with a splash of milk, pour into a greased sheet pan, and bake at 350°F for 15 minutes. Cooled egg sheets become perfect squares for stacking. Combine with crispy turkey bacon or veggie sausage patties between toasted English muffins—wrap each in wax paper before freezing.
| Factor | Homemade | Store-Bought |
|---|---|---|
| Cost per serving | $1.20 | $3.50 |
| Customization options | Unlimited | Limited |
| Weekly prep time | 22 minutes | 0 minutes |
From Frosty to Fantastic
A smear of sun-dried tomato mayo or honey mustard does double duty—it adds zing and keeps the muffin from getting soggy during thawing. My favorite trick comes from a chef friend: “Freeze components separately if you’re using delicate greens, but always assemble sauces first.”
When my neighbor tried this method, she texted: “My kids ate eggs three days straight without complaining—what witchcraft is this?” Truth is, it’s not magic—just smart prep that respects your morning hustle.
Essential Tips for Freezer Breakfast Sandwiches Flavored Spreads
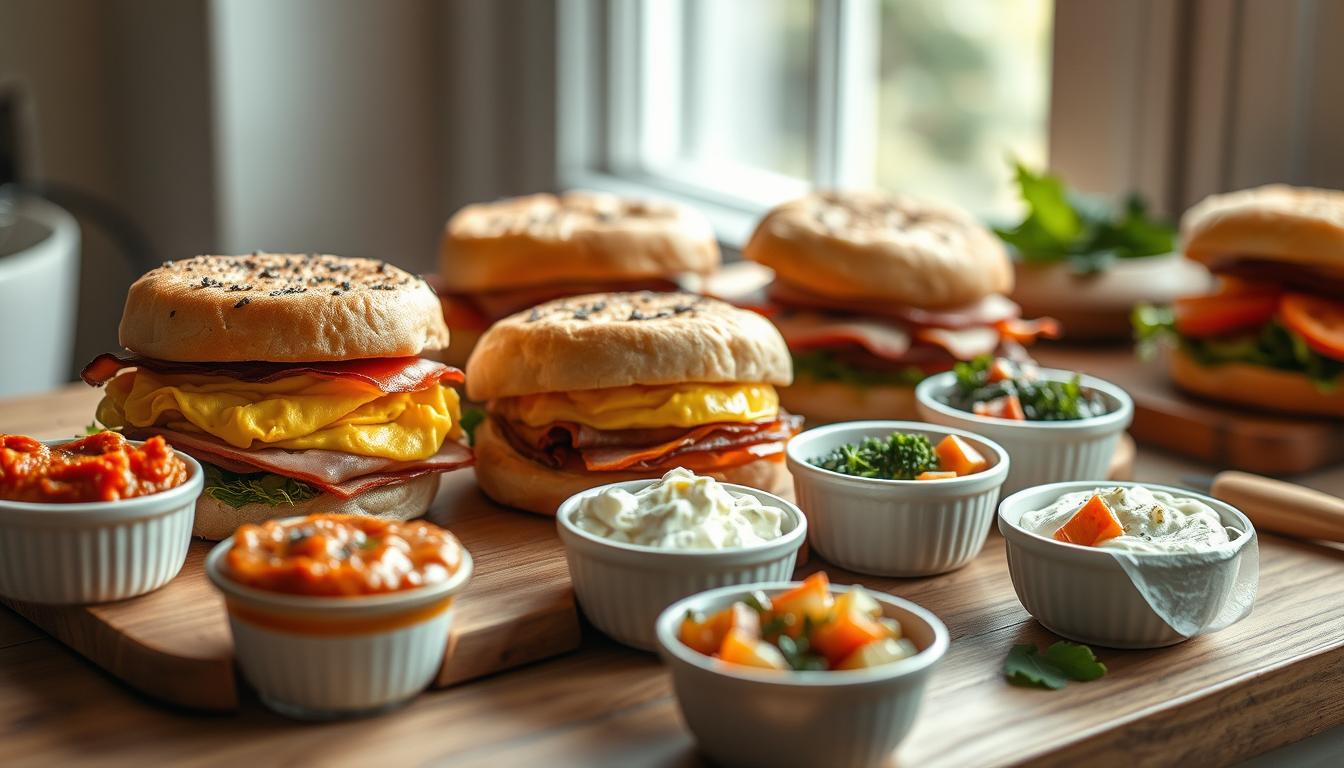
I once forgot to add sauce to a batch of morning meals—the result tasted like cardboard wearing a bacon costume. That disaster taught me spreads aren’t just flavor boosters; they’re moisture-locking superheroes. A dollop of garlic aioli or chipotle mayo transforms basic ingredients into cohesive, crave-worthy bites.

Why Use Flavored Spreads?
Spreads bridge ingredients like culinary glue. Mix softened cream cheese with pesto for herby richness, or blend Greek yogurt with sriracha for tangy heat. These combos prevent dryness while adding personality—key when freezing alters textures. My neighbor swears by “smearing guacamole on both muffin halves—it’s like edible armor against freezer burn.”
Best Practices for Freezing and Storing
Cool baked eggs completely on wire racks—steam trapped during storage creates sogginess. Assemble sandwiches on parchment-lined trays before wrapping individually. For grab-and-go ease, try these protein-packed muffins as alternative bases.
| Wrapping Material | Pros | Cons |
|---|---|---|
| Parchment Paper | Non-stick, compostable | Less insulation |
| Aluminum Foil | Blocks freezer odors | Can tear easily |
| Reusable Silicone Bags | Eco-friendly | Bulkier storage |
Label packages with dates—they’ll stay fresh 6-8 weeks. Reheat straight from frozen: 30 seconds in the microwave to thaw, then 2 minutes in a toaster oven for crispy perfection.
Step-by-Step Assembly Process
I learned the hard way that cold eggs stick to parchment paper like glue. After a messy kitchen disaster, I developed this method for building morning meals that hold their shape. Let’s walk through the process that’s saved countless rushed weekdays in my home.

Preparing the Egg Base and Flavored Mixtures
- Whisk 8 large eggs with ¼ cup milk—this creates air pockets for fluffiness. Add ½ tsp salt and cracked black pepper. Pour into a greased 9×13 pan lined with parchment.
- Bake at 350°F for 18 minutes. The center should jiggle slightly when shaken—it firms up as it cools. Let rest 10 minutes before slicing into 12 squares.
- While eggs bake, mix spreads. My go-to: ¼ cup mayo + 1 tsp smoked paprika. Store in small containers for easy assembly.
Layering Ingredients on English Muffins or Bagels
- Toast split muffins lightly. Spread sauce on both halves—this creates a moisture barrier.
- Place cheese directly on warm bread so it starts melting. Add egg square, then cooked bacon or sausage patty.
- Wrap each in wax paper, twisting ends like candy wrappers. Freeze flat on baking sheets before transferring to bags.
Pro tip from my test kitchen: Reheat wrapped in a damp paper towel for 45 seconds in the microwave. Finish in a toaster oven for 2 minutes to crisp the bread. This combo prevents rubbery textures better than any appliance alone.
Customizing Your Breakfast Sandwich
My nephew once declared my original recipe “too eggy”—a wake-up call to rethink ingredient ratios. That’s when I realized these handheld meals thrive on personal touches. Whether you’re cutting carbs or boosting protein, small tweaks can transform your morning routine without extra effort.

Healthy Ingredient Swaps
Swap regular bacon for applewood-smoked turkey slices—they crisp beautifully and slash sodium by 40%. Try these easy upgrades:
- Use sweet potato slices instead of English muffins for gluten-free crunch
- Mix chopped spinach into whisked eggs before baking for hidden greens
- Replace mayo with mashed avocado mixed with lime juice (prevents browning)
A chef friend once told me: “Nutrition upgrades should feel like discoveries, not punishments.” Her tip? Roast cherry tomatoes with oregano and layer them under melted mozzarella.
Exploring Meat and Veggie Variations
I keep cooked chicken sausage patties in my freezer for last-minute swaps. For plant-based options, roasted portobello mushrooms deliver meaty texture. Consider these combos:
| Protein | Vegetable Pairing | Sauce Match |
|---|---|---|
| Chorizo | Pickled red onions | Cilantro-lime yogurt |
| Smoked salmon | Thin cucumber slices | Dill cream cheese |
| Black beans | Roasted peppers | Chipotle hummus |
My neighbor’s teen twins request different fillings daily—she uses foil wrappers marked with Sharpie colors. “Pink for spicy, green for veggie,” she laughs. This system prevents morning chaos while honoring individual tastes.
Optimizing Cooking and Reheating Methods
I once zapped a perfectly good handheld meal into hockey puck territory by overheating it. That rubbery tragedy taught me reheating isn’t just about warmth—it’s an art form. Let’s explore how different appliances affect texture so you can nail that “fresh-from-the-griddle” feel every time.

Oven, Microwave, and Toaster Oven Techniques
Each appliance offers unique benefits. Here’s how to maximize them:
| Method | Steps | Texture Outcome |
|---|---|---|
| Microwave | Wrap in damp paper towel → Defrost 1 min → High heat 30 sec | Soft interior, quick fix |
| Toaster Oven | Unwrap → 325°F for 8 mins | Crispy edges, melty cheese |
| Conventional Oven | Foil packet → 350°F for 12 mins | Even heating throughout |
The USDA recommends reheating to 165°F for food safety. Use a meat thermometer if unsure. For egg-based meals, lower heat preserves tenderness better than blast-furnace settings.
Avoiding Overcooking for Perfect Texture
Stop the chewiness cycle with these tips:
- Microwave in 15-second intervals after initial thawing
- Place cheese between egg and meat to act as a moisture barrier
- Let sit 1 minute post-reheating for heat distribution
A chef friend shared this wisdom: “Treat reheating like gently waking sleeping ingredients—no rude alarms allowed.” Start with lower temperatures and adjust based on your appliance’s quirks. Your patience rewards you with creamy yolks and crisp bread every time.
Six months ago, I accidentally left a batch of unlabeled meals in my freezer. When my partner grabbed one labeled “test batch,” I braced for complaints. Instead, he asked: “When did you become a diner chef?” That’s the beauty of this method—it turns kitchen experiments into reliable wins.
You’ve got the tools now. Bake those eggs in a sheet pan. Layer with crispy bacon or smoky turkey. Seal flavors with zesty sauces. Wrap tight in wax paper. Whether you reheat in the oven for crunch or the microwave for speed, each bite stays satisfying.
Remember: Your meal isn’t frozen—it’s paused. Swap cheddar for feta. Try bagels instead of english muffins. Roast veggies on Sundays to mix into egg batter. Every tweak makes these meals feel new, even months into your routine.
Share your wins with #NoStressBreakfast. Did spicy sriracha mayo become your hero? Did baking eggs in muffin tins save time? We’re all learning together. Because mornings shouldn’t be a battle—they’re your first chance to win the day.
Savory Freezer-Ready Egg & Sweet Potato Breakfast Stackers
A hearty, make-ahead breakfast featuring layers of roasted sweet potato rounds, fluffy scrambled eggs, and melted cheese. Perfect for busy mornings, these stackers are freezer-friendly and reheat beautifully.

Nutrition Information
Equipment Needed
- Baking sheet
- Mixing bowl
- Whisk
- Non-stick skillet
- Spatula
- Parchment paper
- Freezer-safe containers
Ingredients
-
2 large sweet potatoes, peeled and sliced into 1/4-inch rounds
-
1 tablespoon olive oil
-
Salt and pepper to taste
-
6 large eggs
-
1/4 cup milk
-
1/2 cup shredded cheddar cheese
-
1/4 cup chopped green onions
-
Cooking spray
Instructions

Recipe Video
Savory Freezer-Ready Egg & Sweet Potato Breakfast Stackers
Learn how to prepare savory, freezer-ready breakfast stackers with sweet potatoes and eggs. Perfect for meal prep and busy mornings!