10 Breakfast Meal Prep Mason Jars That Stay Fresh
Discover the best breakfast meal prep mason jars that stay fresh. Get our step-by-step guide to no-stress mornings with prepped breakfasts.
Ever wish you could skip the morning chaos and enjoy something delicious? I’ve been there too—racing against the clock while trying to feed myself well. That’s why I fell in love with layering ingredients in glass containers. They’re not just pretty: these portable powerhouses keep oats creamy, yogurt crunchy, and carrot cake-inspired creations tasting like they were made minutes ago.
In this guide, I’ll show you how to build vibrant morning meals that stay fresh for days. Whether you’re juggling meetings, school drop-offs, or both, you’ll find ideas tailored to your schedule. We’ll explore sweet and savory combos, protein-packed shakes, and even dessert-for-breakfast twists—all ready in five minutes flat.
No fancy skills required. Just grab a jar, layer your favorites, and let the fridge do the work. By Sunday night, you’ll have a week’s worth of nourishing options waiting. Ready to transform your A.M. routine?
Introduction & Benefits of Meal Prepping in Mason Jars
Picture this: It’s 7 a.m., and instead of scrambling for a granola bar, you’re savoring a layered chia pudding with ripe berries. Glass containers simplify mornings by locking in freshness while keeping flavors crisp. Let’s explore why this method works so well for hectic schedules.

Why Stack Ingredients in Glass?
Layering oats, yogurt, or chia seeds creates texture magic. Unlike plastic, glass won’t absorb odors—your coconut flakes stay coconutty. I’ve found that prepping five jars on Sunday cuts my weekday decision fatigue by half. You control portions effortlessly, whether you’re craving cinnamon-apple oats or tropical mango layers.
Fuel That Lasts
Oats and chia expand overnight, turning almond milk into creamy fuel. These ingredients deliver fiber and omega-3s, keeping energy steady until lunch. Fresh fruit adds natural sweetness without refined sugars. One reader told me, “My kids now beg for ‘rainbow jars’—it’s our secret veggie hideout!”
This approach also reduces waste. Reusable containers mean fewer single-use wrappers. Plus, seeing your creations lined up fosters kitchen confidence. You’re not just saving time—you’re building habits that nourish body and routine.
Once you master layering, your fridge becomes a visual checklist—no more decision fatigue or skipping meals because “there’s nothing ready.”
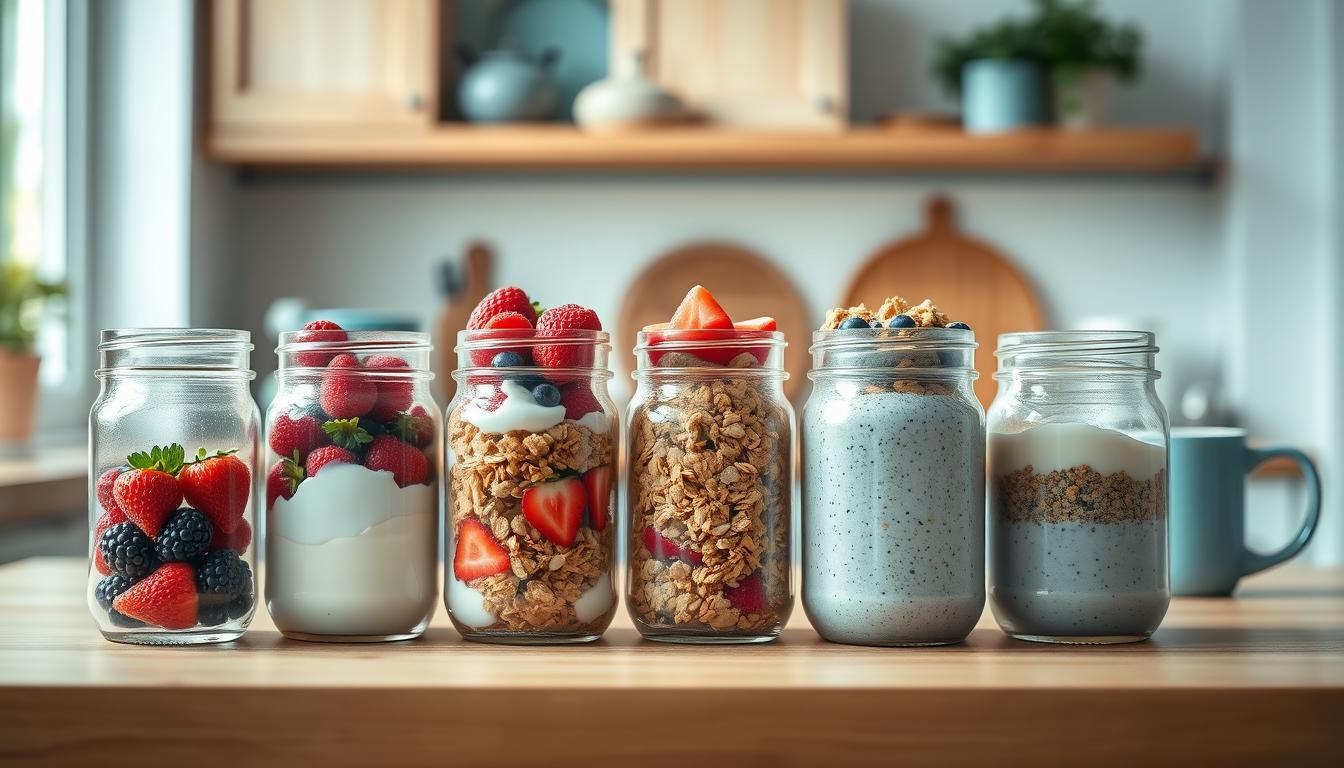
Selecting the Right Mason Jar and Fresh Ingredients
The secret to stress-free mornings starts with two essentials: the right container and quality components. Choosing jars that balance function with style—and ingredients that hold their texture—makes all the difference. I’ve cracked more than one jar lid by rushing—learn from my mistakes!

Size Matters More Than You Think
For single servings, 8-ounce containers keep portions in check. If you’re packing a heartier mix, 16-ounce versions leave room for nut butter swirls or crunchy toppings. Wide-mouth designs make layering effortless—no spoon gymnastics required.
Building Flavor That Lasts
Start with a sturdy base like rolled oats or chia seeds. Add creamy elements (Greek yogurt or almond butter) followed by fresh berries or diced apples. One pro tip? Keep dry toppings like granola in separate mini bags until serving to avoid sogginess.
Don’t shy away from bold combinations—think cocoa nibs with orange zest or tahini drizzled over roasted pears. Your taste buds (and Instagram feed) will thank you. Now, let’s layer up!
Overfilled or narrow jars can cause spillage or uneven textures. Stick with wide-mouth containers and leave space at the top to breathe.
How to Layer and Assemble Your breakfast meal prep mason jars
Let’s get hands-on—imagine crafting edible art that fuels your week. The magic happens when each layer serves a purpose: crunch stays crisp, creamy textures meld, and fruits stay vibrant. Here’s how to build jars that look as good as they taste.

Layering Techniques for Optimal Freshness
Start with your base—oats or chia seeds work best. Add liquids like almond milk slowly to avoid disturbing nut butter swirls beneath. I’ve learned through trial and error: wet ingredients (yogurt, compotes) go in the middle, while crispy toppings (granola, nuts) stay on top until serving.
| Layer | Overnight Oats | Chia Pudding |
|---|---|---|
| Base | Rolled oats | Chia seeds |
| Creamy Layer | Greek yogurt | Coconut milk |
| Fruit | Diced apples | Mango cubes |
| Toppings (add later) | Walnuts | Toasted coconut |
Step-by-Step Assembly Process
- Prep ingredients first: Chop fruits, measure oats, and portion nut butters. This cuts assembly time to 5 minutes per jar.
- Pour liquids gently: Tilt the container and drizzle milk along the side to preserve existing layers.
- Seal tightly: Leave ½ inch of space at the top for ingredients to expand overnight.
One reader shared, “I stack mine during my kid’s naptime—it’s become my weekly reset ritual.” By Friday, your future self will marvel at how fresh every bite still feels.
Improper layering traps moisture—soggy toppings and gray fruit aren’t the vibe. Keep wet and dry ingredients separated until serving time.
Step-by-Step Overnight Oats and Chia Pudding Recipes
Let me share my go-to formulas for no-fuss morning fuel. These combinations have saved countless rushed mornings in my home—and they’re flexible enough to match whatever’s in your pantry.

Classic Overnight Oats with Almond Milk & Chia Seeds
Combine ½ cup rolled oats, 1 tbsp chia seeds, and ¾ cup unsweetened almond milk in your container. Stir in 1 tsp honey or maple syrup. Layer with ¼ cup Greek yogurt and ½ cup diced strawberries. Seal and refrigerate for 6+ hours.
Pro tip: Chia seeds absorb 10x their weight in liquid. This ratio ensures creamy texture without mush. One reader wrote, “My toddler thinks it’s ‘magic pudding’—win!”
Creative Twist: Fruit & Coconut Variations
Swap almond milk for coconut milk and add 2 tbsp shredded coconut to the base. Top with mango cubes and toasted coconut flakes. For chia pudding, mix 3 tbsp chia seeds with 1 cup coconut milk and 1 tsp vanilla. Let thicken overnight, then layer with passionfruit pulp.
- Texture hack: Keep nuts/seeds separate until serving
- Sweetness boost: Mash ripe banana into the oat layer
- Protein punch: Stir collagen peptides into milk first
These ratios work every time: 1:2 for oats to liquid, 1:4 for chia to liquid. Too thick? Add a splash of milk before eating. Too thin? Use less fruit next time. You’ve got this!
Creative Variations for Mason Jar Omelettes and Smoothies

Mornings don’t have to mean choosing between speed and satisfaction. Let’s rethink classic dishes by packing them into portable layers that burst with flavor. These ideas blend convenience with creativity—perfect for those craving variety without extra effort.
Protein-Packed Omelettes in a Pinch
Whisk 2 eggs with diced bell peppers, spinach, and shredded cheese directly in your container. Seal and refrigerate overnight. When hunger strikes, microwave for 90 seconds (lid slightly open) or cook stovetop. The result? Fluffy eggs with zero cleanup.
- Prep smarter: Pre-chopped veggies save 5+ minutes
- Customize freely: Swap cheese for feta or add diced ham
- Double the batch: Store 3–4 jars for grab-and-go mornings
“I prep these on Sunday—my teen microwaves hers while brushing her hair!”
Smoothie Bowls That Stay Vibrant
Blend frozen berries, banana, and almond milk until thick. Pour into jars, then top with granola and chia seeds. For a meal planning system for beginners, freeze ingredients in portions. Just thaw, shake, and enjoy.
| Base | Toppings | Sweetener |
|---|---|---|
| Greek yogurt | Sliced almonds | 1 tsp honey |
| Spinach | Cacao nibs | Dates |
Pro tip: Layer wet and dry ingredients separately to maintain crunch. A drizzle of almond butter adds creaminess with minimal added sugar.
Tips for Storing, Serving, and Reheating Your Meal Prep Jars
That satisfying pop when you open a well-stored jar? It means success. Proper handling ensures your creations stay vibrant from Sunday to Friday. Here’s how to keep flavors bright and textures intact—even during hectic mornings.

Cold Storage Secrets
Use airtight lids to lock in freshness. Stack jars vertically in the fridge’s main compartment (not the door) for consistent temperature. Most layered combinations last 5 days—except egg-based recipes (3 days max).
- Keep crunchy toppings separate in snack bags
- Place citrus slices between yogurt layers to prevent browning
- Label lids with preparation dates using dry-erase markers
Warm-Up Wisdom
For hot options like egg bites: remove metal lids and microwave 1½ minutes at 50% power. Stir halfway. One parent shared, “I reheat my daughter’s jar while packing her school lunch—done in 90 seconds!”
- Lightly grease glass sides with coconut oil before adding batter
- Leave 1-inch space at the top for expansion
- Cover with a paper towel to prevent splatters
Pro tip: If you’re rushing out, let frozen smoothie jars thaw in your work bag for 30 minutes. They’ll stay chilled without turning mushy. Your future self will thank you for that first crisp bite.
Don’t microwave metal lids—ever. Always remove them before reheating, or you risk both your breakfast and your appliance catching heat in the worst way.
Imagine opening your fridge to rows of colorful layers ready to fuel your day. These portable creations—from chia puddings to protein-packed egg bites—prove that smart prep doesn’t mean sacrificing flavor or nutrition. I’ve seen how stacking ingredients in glass transforms rushed mornings into moments of calm, one spoonful at a time.
Whether you’re blending energizing foods into smoothie jars or swirling almond butter into oats, every combination offers endless customization. The magic lies in the method: proper layering keeps textures crisp, while airtight storage locks in freshness. One reader recently shared, “My kids now race to see whose jar has the brightest colors!”
Give these ideas a spin this week. Mix up your bases—try quinoa instead of oats, or swap chia seeds for hemp hearts. Share your creations online and tag #JarMagic—I’ll be cheering you on! With just 10 minutes of prep, you’ll reclaim your mornings and savor every nourishing bite. Here’s to starting strong.
Layered Cinnamon-Spiced Pear Chia Jars
A make-ahead breakfast jar featuring creamy chia pudding, warm cinnamon pears, and crunchy walnut granola. Perfect for busy mornings with a cozy twist.

Nutrition Information
Equipment Needed
- Medium saucepan
- Mixing bowl
- Whisk
- Four 8-oz wide-mouth glass jars
- Spoon or silicone spatula
Ingredients
-
1 cup unsweetened almond milk
-
1/2 cup chia seeds
-
1 tsp vanilla extract
-
1 tbsp maple syrup
-
2 ripe pears, diced
-
1/2 tsp cinnamon
-
1/4 tsp ground ginger
-
1 tsp coconut oil
-
1/2 cup plain Greek yogurt
-
1/4 cup walnut granola (kept separate until serving)
Instructions

Recipe Video
CHIA PUDDING » 6 Flavours for Easy, Healthy Breakfast Snacks | Spring/Summer Meal Prep
For a lower carb alternative to Overnight Oats, and for a super easy way to meal prep healthy & tasty snacks, breakfasts or desserts in minutes, try Chia Pudding!